Quantcast
Channel: Merry Tummy
Viewing all 124 articles
Browse latest View live

Pomegranate (Anaar): Benefits And Healthy Way Of Eating It.

$
0
0

Pomegranate is the most beautiful fruit ever. Every time I see it, I get a lesson- create a life that is good on the inside, and not just the one that looks good on the outside. Outside it is rugged and tough, inside it is beautiful where every seed looks like pearl-fresh, sweet and alive.  Other then this important lesson, pomegranates are also high in nutrients that give you glowing skin and healthy digestion. I know peeling it can be difficult and time consuming but that should not stop you from buying pomegranates. Need some motivation and proof, then see-


Benefits of pomegranates:
  • Prevents heart disease-Antioxidants prevent free radical damage of the walls of arteries, thus preventing heart disease. 
  • Healthy digestion: Eating a pomegranate every day is a good way to add fibre to your daily diet. One pomegranate can fulfill about 45% of your daily recommended intake of fibre.
  • Glowing skin: Polyphenolic compounds in pomegranates are powerful antioxidants that can delay the process of ageing. Therefore, eating pomegranate keeps your skin glowing and radiant for a long time.
  • Dental health: Pomegranate juice can fight off dental plaque thus keeping your teeth and gums healthy.

How to include it your diet:
  • Chutneys: The taste of pomegranate is tangy and sweet so go ahead and mix in chutneys.
  • Yogurt: - Simple, add in yogurt with some chaat massala. Enjoy this healthy dip.
  • Rice: - I sometimes just throw some pomegranate seeds in rice or pulav dishes.
  • Juice: If nothing above impresses you, have the juice-simple. You can include the juice and make this summer cooler drink.


Hope you will now include more and more pomegranates in your diet.


Palak Ka Thepla: Spinach Flat Indian Bread

$
0
0

Happy Earth's Day everyone. Remember, earth doesn't belong to us, we belong to earth.

What is the difference between a  thepla and a paratha, someone asked me. I know, they both are flat Indian bread and have many similarities but they are indeed different from each other. So, I decided to make a table (like how we did in school) jotting the differences in between them.

Paratha
Thepla
Is not always made with whole wheat flour. Paratha can be made with besan (chickpea flour) or even maida (all purpose flour)
Theplas is always made using whole wheat flour.
Parathas can be plain.
Theplas has to be made with some vegetable, else its not a thepla.
Parathas can be made in different shapes-triangle, round, square and even spiral (lacha).
Theplas is always round in shape. Never seen any other shape.
Parathas are also stuffed.
There is no stuffed thepla ever.
In parathas you can add chopped veggies and even vegetable puree in the dough.
Theplas will always have chopped veggies or grated vegetables. Never pureed.
You need water to form the dough of parathas.
You need yogurt (dahi) and water to knead theplas dough.
You may or may not add oil while kneading the dough.
It is a must to add oil in theplas dough.

So, today’s recipe is Palak Ka thepla and not parathas because there is oil and yogurt in the dough. If you omit these two above ingredients you can say these are spinach parathas. There is a fine line you see :-) So next time when you adding yogurt, oil and chopped or grated vegetables in the whole wheat flour dough ,then you are making theplas. I have prepared palak paneer parathas as well; in that I used pureed spinach in the dough which was stuffed with paneer (cottage cheese), I did not use yogurt or oil in the dough. Well that’s too much info, I guess.


Palak Thepla is my everyday thing. It is the easiest way to use greens in your diet. I just break roughly the baby spinach and throw them in the dough. If you are among those who love theplas but doesn't like methi's (fenugreek leaves)  bitter taste then these theplas are a good alternative for you. The green leaves give the same vibrant colour but the taste is not at all bitter.

The theplas have loads of flavours and spices added to it so they are good even if eaten plain. Else serve with any simple everyday dry side dish such as gajar methi mutter, marwadi aloo pyaz, punjabi gobi mutter or bhindi do pyaza. Another way is to have them with yogurt (dahi) or pickle or chutney or jam.


Ingredients:
2 cup whole wheat flour/atta
1 cup chopped spinach/palak
1 teaspoon cumin seeds/jeera
1 teaspoon coriander powder/dhaniya
½ teaspoon turmeric/haldi
1 teaspoon red chili powder/lal mirch
1 teaspoon green chilli-ginger paste/hari mirch-adrak
2 tablespoon oil
2 tablespoon curd/yogurt
Salt as required
Oil for frying

Method:
Wash and chop spinach levees properly and strain the water.
Mix all the ingredients except yogurt and start kneading.
Mix yogurt and form a soft dough. Add water if required.
Keep the dough aside for 15-20 minutes covered with a kitchen towel. Then pinch out 15 balls from them.
Place a ball of dough on a flat surface. Using a rolling pin, roll it out like you would do for chapatti. Sprinkle flour on the thepla as when needed so it doesn't stick.
Heat a heavy skillet, griddle or tava. Place the rolled out thepla on it. Cook till brown spots appear on one side. Turn the thepla over, pour 1/4 teaspoon oil around it and let it cook till golden on both sides.
Repeat for all the dough.


Notes:
You can omit the use oil, simply use a napkin to roast the thepla.
They are very good while travelling- just use more oil to fry them.

Serving Ideas:
Serve hot with chutneyraita or pickle of your choice.
Goes well with any side dish or curry.
These are perfect to be served at breakfast, brunch and as evening or picnic snack.
It is also great for travelling or tiffin boxes.

Cafe Frappe, CCD Style Cold Coffee

$
0
0

India is a tea loving country. Every nook and corner, no matter- town or city there will be a tea vendor selling piping hot cups of tea. There was a time when cafes or coffee culture was not so ‘in’ in India. If you needed to drink something cold to beat the summer heat you would either have cold drink or fresh juice in the market. Later came into picture a cafe called as Cafe Coffee Day or CCD as we called it. It became the place where all youngsters would go- it was cheap, had beautiful red and white sitting arrangement and most important they served cold coffees.

[More coffee recipes-Eggless coffee cake with fresh cream , Coffee whiskey cake with white chocolate glaze,  eggless orange coffee marble cake ]

CCD would never ask you to leave the place when you were done paying the bill. They came with the punch line- ‘come, share conversations’ and I loved it for that. No matter what, you could be there for hours just talking to friends, reading the book, listening to music or have some me-time. In fact I met my husband there for the first time, we sat there discussing about our lives, families and marital things. Oh, gosh 5 years and I can still smile and blush thinking of those conversations. ;-)


So, there we were sipping coffee and talking some serious things. I had Cafe Frappe. Frappe in simple words mean chilled or cold. Cafe Frappe is a cold coffee, combination of chocolate and coffee. Its bitter, its cold and its creamy. If you are a coffee lover, you must and must give this Indian style CCD cold coffee a try this summer. Nothing fancy, just throw everything in the blender and mix. By the way, if you seriously love coffee (like me) then you must hop on this amazing visual article on Brewing Success: Coffee Break-it is a great read.

Till then, serve this cold coffee with ice-cream in tall glass with some coffee sprinkled on top for more flavour. Do your favourite thing- watch a movie, read a book, paint, relax in the balcony but take out some time and enjoy this chilled glass of coffee-I bet you won’t regret.

Ingredients:
5 tablespoon instant coffee
1 cup water
2 cups milk
2 tablespoon unsweetened cocoa powder
1 1/2 tablespoon sugar
1 scoop vanilla ice-cream
5 ice cubes
1 teaspoon coffee powder

Method:
Heat 1 cup of water. Mix in instant coffee. Mix till coffee is dissolved.
In the blender, mix milk, coco powder, ice cream and ice cubes. Blend till you see bubbles.
Pour this in two tall glasses. Sprinkle coffee powder on top and serve.


Notes:
For the authentic taste, please use full fat milk and ice cream.
You can increase the amount of icecream for more sweet and creamy coffee.
This coffee is bit on bitter side, but if you like sweet, then add more sugar.
Makes 2 tall glasses of coffee.

Serving suggestions:
Serve with chocolate chips, chopped nuts or fruits.

Pomegranate and Yogurt Dip: Anaar Ka Raita: Healthy Summer Recipe

$
0
0

Happy Monday everyone. Looks like I am hooked on pomegranate these days. I don’t why but I cant get over this beautiful fruit. Every time I see it, I get a lesson- create a life that is good on the inside, and not just the one that looks good on the outside. Outside it is rugged and tough, inside it is beautiful where every seed looks like pearl-fresh, sweet and alive.  Other then this important lesson, pomegranates are also high in nutrients that give you glowing skin and healthy digestion. I know peeling it can be difficult and time consuming but that should not stop you from buying pomegranates. Need some motivation and proof, then see this post  on what is the benefits of pomegranates and why should one eat it more?

I am still in the weekend mood so feeling a bit lazy to type more, so let me quickly get to the recipe- Pomegranate and Yogurt Dip. This is in one word the best summer dip ever-its quick, light on tummy and super healthy. This dip is like spring in the bowl-so bright and beautiful-sigh!.  Creamy thick yogurt is mixed with juicy fresh pomegranate, in it goes hint of mint and some tangy spice mix (chaat massala) and there you have one amazing, super easy dip ready.


In India this is simply called as Anaar Ka Raita, which is paired with rice dishes such as  methi mutter pulavbasic biryani, corn rice or mixed capsicum rice.. In my home, this is preferred more like an evening nibble snack served with biscuits, nachos, crackers or chips. Sometimes we just head to the nearest park with a good book, a bottle of wine, this dip and some biscuits. 


Ingredients:
1 cup yogurt/dahi
1/4 cup pomegranate seeds/anaar
1 teaspoon chaat massala (recipe here)
2 leaf of fresh mint/pudhina

Method:
Mix yogurt and chaat massala properly.
In it, add pomegranate seeds and mint leaves. Mix.
Serve in a bowl.


Notes:
I used low fat yogurt, but feel free to you use any.
Chaat massala is available in any Indian grocery store. Or you can buy MDH Chunky Chat Masala.
If you like spicy dips, feel free to add black pepper powder or chopped green chillies.

Serving suggestions:
This is a dip, so goes well with nachos, crackers, chips or biscuits.
I like to sometimes have it as a side with mixed vegetable paratha, bombay tava pulav or baked potato wedges.

To complete the meal you can use this with salad and vegetable kebabs in pita pockets.


Mint (Pudhina): Benefits: How To Include It In Your Diet: Tips For Weight Loss: And Recipes Ideas

$
0
0


Mint, I guess is one of the most underestimated green. You will hear how good it is to eat spinach or kale or coriander leaves but you hardly hear same about the mint. Mint as we call pudhina or podhina in hindi is infact the healthiest green ever, also one of the cheapest.

Mint belongs to the herb called as mentha which is known for its aromatic quality. So other than just using it as mouth freshener, there are many benefits of mint:
  •  The menthol present in mint helps the enzymes necessary for digestion. They relax the smooth muscles of the stomach, reducing the chances of indigestion.
  • When mint extract is used on an area that is hurting, it immediately provides a cooling effect, causing the area to partially become numb. This helps in lessening the pain. So now you know why balms have mint in it.
  • Since pudina has a very strong aroma, it gets to stimulate your brain functioning and helps cure nausea.
  • Mint juice is an excellent skin cleanser. It soothes skin, and helps to cure infections and itchiness, as well as being a good way to reduce pimples, and it can even relieve some of the symptoms of acne.
  • Adding mint to your diet, you are increasing the amount of fat that is being consumed and put to use, rather than being stored and contributing to your weight gain.
  • Mint if rubbed directly on the teeth and gums will refresh the mouth and eliminate dangerous forms of growth. That’s why even toothpaste producers use mint extract.
  • Mint leaves are packed with nutrients such as calcium, phosphorous, vitamin C, D, E and small amounts of vitamin B complex. All these compounds put together improves the body’s immune system, keeping it safe from infections and inflammation. 


How to consume more mint leaves:
  • Mix in your dinks. Add mint leaves in water, juices or smoothies. I like to add mint leaves in green tea as well.
  • Add in chutneys or throw some in salads.
  • Use chopped or pureed mint leaves in parathas. I often use dry mint powder in parathas for extra flavour.
  • If you really love mint flavour why not garnish your side dishes (subji) with chopped mint leaves. 
Tip for weight loss:
In a jug add 1 liter water, to it add 4-5 mint leaves. Leave this water overnight. Nex day drink this water throughout the day. This mint infused water act as a flat trimmer and also improve the digestion.

My recipes with mint:

Strawberry Lassi: Yogurt Smoothie: And A Healthy Menu Idea

$
0
0

If a guest visiting you is a weight watcher, one who is too strict about calories and diet, what recipes you choose? I was in the same dilemma a week before, I had to make a complete meal for someone who prefers only healthy meals. I put in lot of thoughts and took a quick look at my blog’s recipes. Below is what I decided for the menu.

I know, you will say that lassi is not a dessert. Well, people in the UK love to have lassi as desserts. There are two reasons for that, one-yogurt is very rich in calcium and ascorbic acid which helps in digestion and so it being the last meal is good for your body. Second- lassi is sweet, so it suffices as dessert very well.

So what is lassi? In simple words it is a smoothie made with yogurt/curd (dahi) as a base, to it you can add in any fruit like mango, berries. Authentic lassi of Punjab isn't that simple and fat free, it is loaded with sugar and malai. Only after coming to the UK I tried  mango lassi for the first time, in India we get plain lassi-sweet or salty but never the ones with the fruits. 

Strawberry lassi is fruity berry twist to regular lassi and the baby pink colour is to die for. Strawberry is sweet and juicy, where as yogurt is tangy and therefore these two ingredients when mixed together balances each other very well.


Lassi isn't good if its not chilled, I mean its a summer drink- it has to be cold, refreshing and revitalizing. I did not add extra sugar, so its even healthier. It is filling too, you can give it your kids as an evening snack, or have it as post-workout or gym snack. No matter what you will enjoy this lassi. Below is how to make Strawberry Lassi.

Ingredients:
Approximately 20 strawberries
3/4 cup yogurt/dahi
1/4 cup milk
1/2 teaspoon cardamom powder/elyachi

Method:
Wash strawberries and remove the stem/stalk. Keep it on the strainer and drain the excess water.
Mix yogurt and milk in the blender and blend till you see bubbles.
Add in strawberries and cardamom powder. Blend again till you see no big chunks of strawberries.
Pour in glasses and chill before you serve.


Notes:
If you like sweet lassi, feel free to add 1-2 tablespoons sugar.
I used more yogurt and less milk, but this ratio is completely depends on your choice. If you prefer creamy lassi, add more yogurt. For thinner lassi, add more milk. I used full fat yogurt and milk but feel free to use anything you want.
Chill it in the fridge for atleast 2-4 hours before you serve.

Serving suggestions:
It is a great pre or post workout drink. It is healthy and filling.
If you are late for work, then have this as a breakfast.
It is a great idea to serve it as side with any meals.
Pour into fancy wine glasses and serve in your parties or get-together.


Patta Gobi Mutter Subji: Cabbage and Green Peas Curry: Easy Stir Fry

$
0
0

You know the days when you are just not in the mood to cook. I always tend to make simple stir fry kind of side (sukhi subji) on such days. Palak bhaji (spinach stir fry) is one of those recipes-quick and yet loaded with flavours. Another one is gobi mutter (cauliflower and peas) curry, again-simple and quick. Today's recipe also lies in the same category.

Patta gobi (cabbage) mutter (green peas) subzi is what I am talking about. Patta gobi or band gobi takes less time to cook and is loaded with fiber, so I always try to include it in my diet. I have prepared leftover patta gobi paratha as well. And If you follow my blog, you would know, Mr. Husband loves green peas (matar)-any time and any form. So this subji is like a win win situation for both of us ;-)


If you want to cook Indian food in less time, you must give this subji a try. I mean it is ridiculously easy and you don’t need many ingredients-just basic Indian spices. Have you ever eaten the gujarati patta gobi salad (kachumber)? Well, this recipe is more like it, only with peas. For the best taste, don’t overcook cabbage, don’t let it turn soggy or mushy. You must half cook the cabbage for the prefect taste; the crunchy (yet cooked) cabbage gives a new dimension to this subji. Cook this when you have less time in hand or just want to enjoy simple Indian cooking.

Ingredients:
2 cups chopped cabbage/patta gobi
1/2 cup green peas/mattar
2 green chilli chopped
4-5 curry leaves
1/4 teaspoon turmeric/haldi
1/2 teaspoon mustard seeds/rai
1/2 teaspoon coriander powder/dhaniya
1/4 teaspoon black pepper powder/kali mirch
1 tablespoon lemon juice
Salt to taste
1 tablespoon oil

Method:
Heat oil in a pan. When oil gets hot, add mustard seeds. Let it crackle.
Add curry leaves and green chillies.
Add peas and cabbage. Add turmeric powder and salt. Mix.
Cover and cook for 1 minute on medium heat.
Add all the remaining spices and mix. Cook covered for 2 minutes.
Serve hot.


Notes:
I used frozen peas, they cook quickly. If you are using fresh green peas, then boil them separately.
You can use any cabbage in this recipe- purple, white or green or even Chinese cabbage. But remember not to overcook cabbage. Cabbage must be half done.

Serving suggestion:
Serve as a side with any Indian main dish.
Put it as a stuffing between two slices of bread and serve like a sandwich.
Great tiffin snack for kids.


Aloo Matar Ki Subji, Restaurant Style

$
0
0

Nothing beats home cooked food...better if it’s made by your mother. Agree? 7.30 pm and I was back from my accounts tuition class. Maa was in the kitchen, in a printed blue chiffon sari, cooking dinner for us. Very carefully she added spices and gave it a mix. Quickly she kneads the dough and started making piping hot parathas. Oh that moment, when I close my eyes, I can see it all. Quick boil in the curry and she gave a spoon and asked to taste it. I grabbed the spoon and tasted aloo mutter ki subji, she waited for my answer...with spark in my eyes I replied-maa its super yummy, just like restaurant, how do you cook it?  Those little moments between a daughter and a mom, I wish I could freeze them forever.

Years later, she taught me how to make Aloo Mutter ki subji, like hers. Every now and then when I cook this subji, I wish I was a young girl who could go back to those days again. That’s about cooking, it engulfs you in memories and then when you bite into it, everything becomes better. Restaurant style aloo mutter ki subji (potatoes and peas curry) is one of those memorable dishes that happens once a while in my kitchen...it is a not every day curry, you need time and patience to cook this.


So what makes a perfect restaurant style Aloo Mattar Ki Subji?
  • Consistency-it is not dry (sukha) and it is not very watery (rassewali, jholwali) either; it is the balance of two, where you add water only to coat the veggies.
  • Dried fenugreek leaves (Kasturi methi)- you have and have to serve this curry with sprinkle of  kasturi methi.
  • Ginger and garlic paste- this is a must too. For the authentic taste, you need to add ginger garlic paste.
  • Tomato puree- for the restaurant style, tomato puree is what you need; there must be no chunks of tomatoes.
  • Garam Massala- Garam massala is a hot spice mix and it is one of the most important ingredients to make the perfect restaurant style curry.
So to master the perfect taste, please follow the above steps- not that complicated-isn’t it? So, lets see the recipe.


Ingredients:
4 medium size potatoes, boiled and chopped
1/2 cup green peas/mutter boiled
2 medium size tomatoes
1 teaspoon ginger-garlic paste
2 tablespoons oil
1/4 teaspoon asafoetida/hing
1 bay leaf/tej patta
1 teaspoon cumin seeds/jeera
1/2 teaspoon turmeric powder/haldi
1 and 1/2 teaspoon red chilli powder/lal mirch
1 teaspoon coriander powder/dhaniya
1/2 teaspoon garam massala (recipe here)
Salt to taste
1 cup water
1 teaspoon dried fenugreek leaves/kasuri methi (see notes)

Method:
In a blender, blend tomatoes with 4 tablespoons of water, garam massala, coriander powder, turmeric powder and red chilli powder into puree.
Heat oil in a wok/kadai. When hot, add cumin seeds. Let it crackle.
Add, bay leaf and asafoetida.
Add ginger garlic paste and cook for 1 minute. Turn the heat to slow.
Add tomato and spices puree. Mix. Cover and cook till tomatoes paste become red in colour and oil starts appear on the sides. Approximately for 8 minutes.
Add salt, chopped potatoes and peas. Mix. Add 1 cup water. Cover and cook again for 10 minutes. After 10 minutes, cook again for 5 minutes, the spices must have coated the potatoes and peas. If you see it is water, let it boil for more time.
Garnish with kasuri methi and serve.


Notes:
Cook it on slow heat, this ensures that spices are well blended with potatoes and peas.
You can add chopped coriander leaves as well.
This is a bit on spicy side, feel free to reduce the quantity of red chilli powder as per your taste.
Kasturi methi (dried fenugreek leaves) is easily available in any Indian grocery store. I used MDH one.  

Serving suggestions:
Serve with any Indian bread- roti, parathas, puri or naan.
It is simple in process, but the taste is really elegant, so why not serve in parties.
Goes well with rice as well.
For Punjabi thali, serve it with rice, makke ki rotidal makhani and some chilli pickle.
For gujarati thali, serve it with palak puri, keri nu rasand dhokla.
For rajasthani thali- serve it with jowar ki rotimarwadi Bharwa Bhindi. and parathas.


Gujarati Dabeli

$
0
0

How was the long weekend everyone? In the UK people got the news of the royal baby and it’s a girl was trending everywhere. I even heard that tower bridge; the most iconic building was glowing pink-cool isn’t it. While the British waited for the good news, we just spent the laziest weekend ever. Instead of taking some individual me-time, we both decided to do things that we both can enjoy equally. Even though we both are cancerian but our choices just never match and opposites attract is the best suited phrase in our case.

-It began with reading; our books have been lying untouched for over a month, so we finally started reading it.
-Watching TV, we both started seeing Bates Motel but never finished it. This weekend, we are done with its three seasons, yes yes, binge watching it was!
-Went for a walk in the rain. Walked for over 2 hours, hand in hand in the park that we both wanted to see since two years, and guess what, it wasn't the park, it was an old cemetery. Imagine woods, tall trees, light wind, rain, narrow paths and graves....sounds exciting? For us, it was a very beautiful experience.
-Naps. All the three days, afternoon naps happened. While the weather gods decided to be cruel this weekend, we just did not care. Blissful naps, what else can you ask for.
-Cooking, just cooked one time in the day. If I made lunch, we did dinner outside and vice versa.


On Saturday I decided to make Dabeli, for two reasons. First, we both relish dabeli equally and second, I knew Mr. Husband could help me in the preparations. (He doesn’t like elaborate cooking).

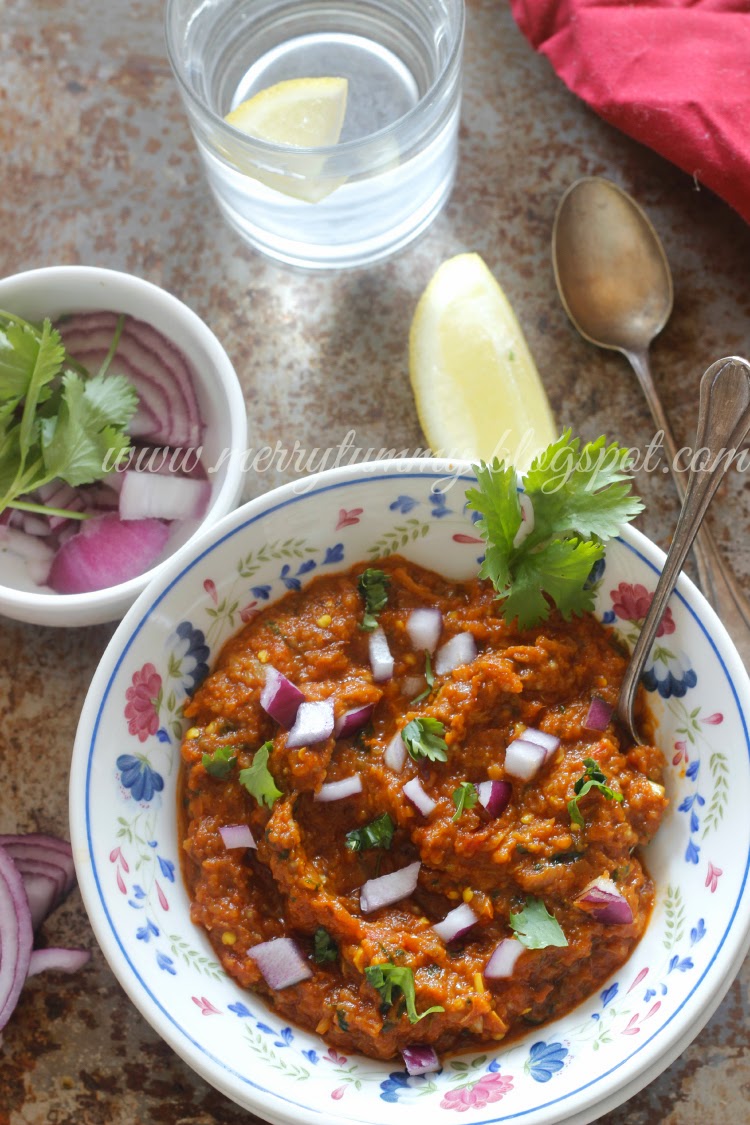
What is dabeli? Dabeli is an indian burger whose origin is from Gujarat. The filling is made with mashed potatoes, tomatoes and dabeli massala. Dabeli massala is readily available in the indian grocery stores but I always make it fresh, nothing beats the aroma and flavour of freshly grounded spices. Tastewise, it is spicy, sweet, tangy and sour-a perfect balance is what you are looking for.


If not thousand there are hundred ways of making dabeli and no one way is right. For kutch dabeli you need spicy garlic chutney and green chutney is used in ahemdabad style dabeli. In Maharashtra coconut is used in dabeli masala. You can make dabeli filling as per your taste but dabeli massala is always used and you just cant do without it. Bun or pav as we call it in hindi must be used for authentic taste, but since we don't get pav in London, I used burger buns.

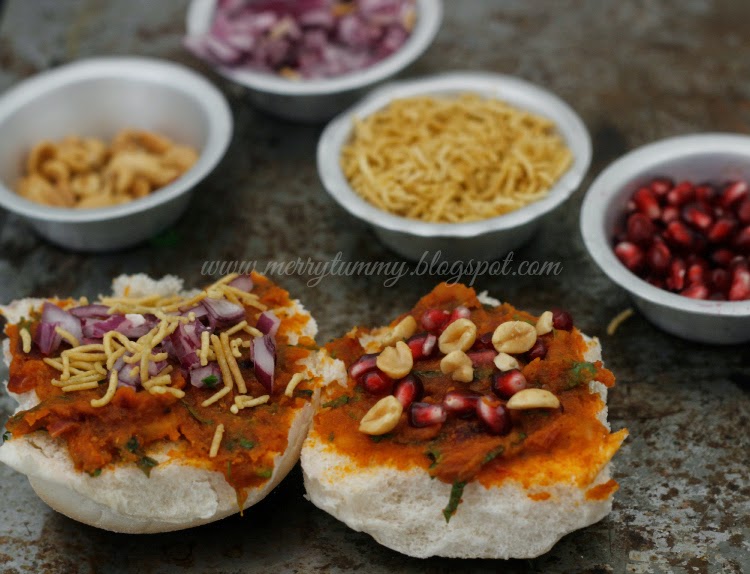
Dabeli is just a breeze if you have everything ready. Pomegranates, peanuts, onions, chutney, sev (namkeen) and potatoes stuffing is must for dabeli. On top on the bun goes thin layer of chutney; on it goes thick sheet of potato mixture followed by peanuts, pomegranates, sev and chopped onion. Then this sandwiched bun is heated on a tava/pan with lashings of butter. It is great tea-time snack or even party snack. Keep the dabeli ready and just roast it on the tava when the guests arrive.


I made amdavad style dabeli, like the ones you get on the road; its sweet, spicy and tangy. It’s without garlic chutney and is served with tomato ketchup.  

Ingredients:
(Dabeli Massala)
2 teaspoons whole coriander seeds/sabut dhaniya
1 dry red chilli/sukhi lal mirch
1 teaspoon cumin seeds/jeera
1 inch peice of cinnamon/dal chini
2 cloves/laung
5 blackpepper corns/kali mirch
(Stuffing)
4 meduim size potatoes/aloo, boiled
2 meduim size tomatoes/Tamatar, chopped finely
1 tablespoon ginger paste/adrak
2 tablespoon butter
1 tablespoon oil
Pinch aseofetdia/hing
1/4 teaspoon turmeric powder/haldi
1/2 teaspoon red chilli powder
1 tablespoon sugar
1 teaspoon lemon juice
Salt to taste
4 tablespoons coriander leaves/hara dhaniya, chopped
(Garnish)
1/4 cup green chutney (recipe here)
6 tablespoons roasted peanuts/ moongfali
6 tablespoons pomegranate/annar
1 onion chopped finely
6 tablespoon sev (see notes)

Method:
On slow heat dry roast dabeli massala ingredients for 8 minutes. Let it cool. Grind this into fine powder. Keep aside.
Heat a pan. Add 1 tablespoon butter and oil.
Add aseofetida. Add ginger paste. Cook for 1 minute.
Add tomatoes, turmeric powder, red chilli powder and salt. Cook till tomatoes are mushy and oil appears on the side.
Mix the grind dabeli massala and cook again for 1 minutes.
Add potatoes. With masher or a fork, keep mixing and mashing the potatoes.
Add in lemon juice and sugar. Cover and cook for 2 minutes on slow heat.
Mix in chopped coriander leaves and the mixture cool down.
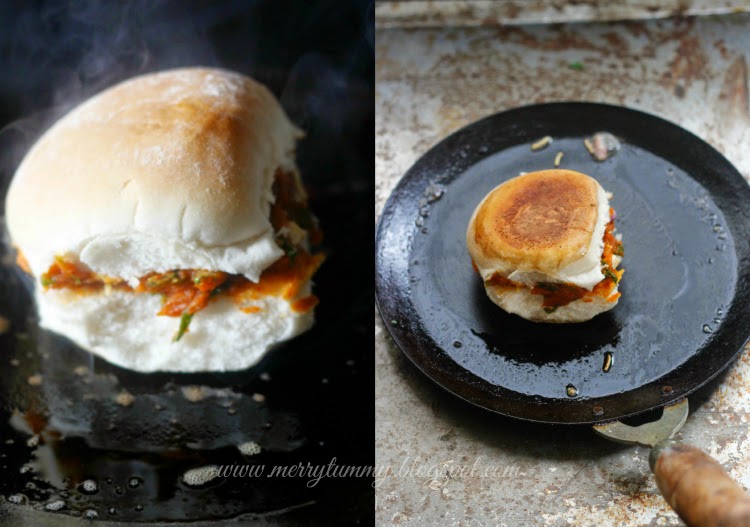
Take a bun and slit it into two parts. Spread a thin layer of green chutney on both the parts.
On one part apply the thick layer of potatoes mixture. On another part apply 1 tablespoon each of pomegranate seeds, peanuts, chopped onions and sev. Put the other part on top of another (like a sandwich). Do same with the remaining buns.
Heat a pan and add remaining 1 tablespoon of butter. On a medium heat, roast the dabeli/bun on both the sides till it is crisp and golden.
Serve with chutney or ketchup.


Notes:
Dabeli massala can be made ahead of time. It says well in an airtight container for 6 months. If you want you can use this Dabeli Masala.
Nylon sevis used in dabeli recipe, but I used Kohinoor Bikaneri Bhujia.
My husband is allergic to nuts, so I used sunflower seeds for his dabeli instead of peanuts and it taste the same.
Some recipe calls for onions in the potatoes mixture, but I asked once to a roadside vendor and he said not to put onions.

Serving suggestions:
Dabeli can be made ahead of time. Assemble the dabeli and grill it on the pan/tava when guest arrive. This makes it best for party, get-togethers.
You can follow the same recipe and use bread slices instead of buns. Grill and serve this dabeli sandwich. Also take this as a picnic snack if you wish.
Make the whole platter. Serve baked potatoes wedges on side with dabeli.

Mango Lassi: Aam Ki Lassi: Restaurant Style

$
0
0

Last year UK government put a ban on import of mangoes. Whole summer season passed away and there was no sight of mangoes. Friends and family in India uploaded the pictures on facebook and instagram of/with mangoes-ah I was so jealous. There was a time when I hated mangoes; because the fibre would stick in my teeth and the heat of mangoes would give me horrible pimples on my face. For me mango was confined to readymade Indian drink such as slice or mazza or frooti.

Then I got married to a mango addicted person, someone who can live on mangoes. I gave him all possible reasons-cum-excuses on why I hate mangoes, but he only smiled. One day, he got alphanso mangoes from a very old and famous Mumbai vegetables/fruits market. Quietly he kept the box of mangoes in the fridge. Next morning, he soaked two mangoes in the water for two hours. He came in our room; he had two plates, one knife and 1 fork with him. While was getting grumpy seeing the mango, he just dint react. Very carefully he peeled the mangoes with the knife, and neatly chopped mangoes into small pieces (that was the tidiest mango chopping, I ever saw). He picked one tiny piece with a fork and asked me to smell it. Okay, I said and sniffed. Now eat it, he said. No way, I replied. Just one piece, he forced. I opened my mouth and gulped. And it was summer in my mouth- fresh, pulpy, sweet and juicy mango; yummy I said in excitement. He smiled, gave the plate and fork to me and said, enjoy! And that is how and when I fell in love with alphonso mangoes.


My relation with mangoes has gone stronger after coming to London, I tried many mango recipes. I have prepared classic Indian mango phirnieggless mango mousse with canned mango pulp; I treated my husband with mango mousse cake on his birthday two years back; you can see gujarati keri nu ras (aamras) recipe on my blog too; or check French mango crêpe cake if you like something fancy. Today it is a simple and easy mango drink that is very famous in the UK, called as Mango Lassi.

Also, mangoes are the favorite fruits of my two mothers, maa and mom in law, so I just timed it right for Mother's day :) In case you are still wondering about gift ideas, then see my post on 5last minute budget gift ideas for mothers' day.

Lassi is a Punjabi (north Indian) drink that is relished during summers. I explained in detail about lassi in the post of Strawberry Lassi. There are many ways to make it and no one way is right or wrong. Basically mango pulp and yogurt (dahi) are the two main ingredient, rest all depends on your preference. Ingredients like cream, rose water, milk, ice cubes, sugar, mint leaves, saffron (kesar), cardamom (ilyachi) are the elements that you can add or omit depending on your taste.


The lassi recipe I am sharing today is one that we get in the Indian restaurants here in the UK. Restaurant style mango lassi is sweet and thick, dark yellow in colour, garnished with saffron threads. You can see lots of modifications in the notes below.

Ingredients:
2 ripe mangoes (I used alphanso)
1 cup yogurt (I used full fat)
2 tablespoons sugar
1 teaspoon saffron/kesar
4 ice cubes
2 tablespoons milk

Method:
Peal mangoes and remove all the pulp. Discard the seed.
In the blender, blend yogurt, mango pulp, sugar and ice cubes.
Heat two tablespoons milk. (I used microwave for this). Mix 1/2 teaspoon of saffron in the warm milk.
Put saffron and milk mixture in the blender and blend again.
Serve in glasses. Garnish with remaining saffron threads. Serve chilled.


Notes:
You can use cream for creamy and velvety texture.
For thinner lassi, use 1/2 cup milk and 1/2 cup yogurt.
You can add vanilla essence, cardamom or rose water for flavour. However I feel these ingredients are more powerful and thus the real mango taste subsides.
Mixing saffron in milk gives dark yellow colour to lassi, however this is optional. You can skip saffron for garnishing as well.
Quantity of sugar also depends on mangoes. Adjust the sugar depending on how sweet the mangoes are.
Saffron is available in any Indian grocery store. I used Mehr Red Saffron.

Serving suggestions:
For a party, serve in fancy wine glasses. Garnish with rose petals, saffron threads, chopped nuts.
It is filling too, you can give it your kids as an evening snack, or have it as post-workout or gym snack.

Mixed Quinoa Salad Served In Taco Shells: Quinola Mothergrain Review

$
0
0


Some food was introduced to me only after coming to the UK. Things like baobab fruit, kale, flaxseeds and quinoa. Four years back quinoa was the trend setter in the food market and internet food world. Everyone was talking about it, buying it, cooking it and writing about it on blogs. I too did some research and found out that the much hyped quinoa is actually healthy. Researchers, dietitians, health freaks everyone proved with their stories and data that quiona is health food superstar. Two years back I tried quinoa and posted Indian style steamed cakes- quinoa and oats dhokla recipe.

Quinoa, pronounced as ‘keen-wa’ is a great wheat-free alternative to starchy grains such as rice and pasta.  Recently Quinola Mothergain sent me three packets of red, white and black quinoa.

Pearl (white) - the smooth one.


Red-the nutty one.


Black- the crunchy one.


At Quinola they are convinced that you will fall in love with quinoa. That is why they only do quinoa based products. Their quinoa is Peru’s finest and tastiest and has won many awards for its quality. It gluten free, vegetarian and gets cooked in 20 minutes-what else could you wish for! Well they are also into express quinoa (one that is instant), baby quinoa and kids quinoa . For more detail on what is quinoa, what are the benefits and recipes do check-http://quinola.com/ 


They give you 5 reasons why everyone should try Quinola and I am totally convinced :)


I mixed 1/4 cup each of Quinola quinoa and tossed along with sweet corn, bell peppers and some seasoning and made a quick salad. It looked colourful and the taste was nutty, crunchy and smooth-all in one. Later, I filled the salad into taco shells for Mexican touch and to complete the meal. That is what I love about quinoa, you can serve it as a side salad, mix it up with chickpeas, beans or just some veggies, roll it tacos or enchiladas for a complete dinner meal -the ideas are endless.


Ingredients:
1/4 cup white (pearl) quinoa
1/4 cup red quinoa
1/4 cup black quinoa
1/4 cup sweet corn boiled
1/4 cup bell pepper chopped finely
1 green chilli chopped
Salt to taste
1 tablespoon olive oil/butter
1 teaspoon lemon juice
1 and 1/2 cups water
4 taco shells

Method:
Heat oil in a pan. Add butter/oil. Reduce heat to slow.
Throw all the three quinoa into the pan. Roast the quinoa on a slow flame till you hear popping sound.
Add water and salt. Cover and cook for 30 minutes. After 30 minutes, take a fork and fluff the quinoa seeds.
Mix bell peppers, sweet corn, green chilli and lemon juice.
Heat taco shells in the oven at 180C for 2 minutes. Fill the taco shells with quinoa salad and serve.


Notes:
You can use any kind of quinoa, not necessary to use all three kinds.
Mix boiled chickpeas, red kidney beans for more filling meal.

Serving suggestions.
Serve as a side salad with any main dishes like burger or pasta.
Roll this salad in tortilla wraps with some patties and serve.

Disclaimer: I was not paid or told to write positive review. The post is based on my experience and is unbiased. Thanking Quinola Mothergrain for sending quinoa for review.

Aam Panna: Raw Mango (kairi) Drink: Indian Summer Cooler

$
0
0


If you have ever been to India during summers you will understand that summers in India are not the sunny, warm and bright like London. Summers in India mean scorching heat, sand storms and sweaty days. The sun used to be so hot that we were not allowed to step outside the house in afternoons. We would either sleep or gang up in the house with friends and cousins and play all sorts of indoor games such as carom, ludo, snack and ladder, dumb charades and what not. Unlike kids today, we did not play artificial games like candy crush saga or temple run. We had active childhood, we wanted to run, jump and play the real energetic games. Oh what days!


May is known as the mango month in India and no matter what my grandfather made sure that we get to relish seasonal mangoes. Raw mango or kacha aam or kairi or ambi was always bought in abundance. All the ladies of the house would sit in the veranda and chopped raw mangoes into wedges; carefully my grandmother would add oil and spices. She then mixed it all with her wrinkly hands and made sure that every piece of mango is coated with spices. Later the pickle was filled into the glass jars and had sun bath. After 15 days we got to eat the most hygienic, tasty and amazing pickle in the world.


When it stroked four in the clock my mom would serve us with all kinds of summer coolers such as massala chaas, lemonade, cold coffee , rose ice tea or anaar ka sharbat. Growing up we never had readymade drinks like coke, canned juice or soda. One summer drink that was must in the May was Aam Panna. Aam Panna is made with raw mangoes or green mangoes and is considered to be a very healthy drink. The ancient Ayurveda and age old wisdom of grandmothers insist on drinking Aam Panna during summers because of its medicinal values.  Raw mangoes have heat-resistant properties and thus this drink is considered as the best option to beat intense summer heat in India.

What is Aam Ka Panna? Aam panna is a refreshing drink made with raw mangoes (kairi) infused with Indian spices and is served chilled. Aam ka panna is also called as Kairi Ka Pani .There is no thumb rule recipe to make this drink and every household makes it in their own way. Some roast the mangoes on the direct heat of hob, some pressure cook and some just boil it in the water. I always use the pressure cooker method, even though I love the roasted procedure. I have electric hob here and thus the whole roasting becomes a  mess :-(. Anyways pressure cooker method is easy and quick. Things that are must in Aam Panna is mint, roasted cumin powder (bhuna jeera), black salt (kala namak) and chaat massala. You can either use jaggery (gud) or sugar to balance the sour taste from raw mangoes.


Ingredients:
5 small raw mangoes/kairi
1 teaspoon roasted cumin powder/bhuna jeera (notes)
1 and 1/2 teaspoon black salt/ kala namak (notes)
1 teaspoon chaat massala (recipe here)
5 tablespoons sugar
1/4 teaspoon black pepper powder/kali mirch
10 mint leaves
4-5 ice cubes to serve

Method:
Wash raw mangoes in the running water really well.
Chop raw mangoes in two parts and put in the pressure cooker with 1 cup of water on medium heat for 1 whistle.
When the cooker cools down and pressure is released, open the cooker. Remove the mango seeds and skin. Try to squeeze out as much pulp as possible.
In the mixer or blender, mix mango pulp, sugar, black salt, chaat massala, mint leaves, black pepper and cumin powder. Blend it all for 10 seconds.
Mix 2 glasses of water in the blended pulp and sieve it.
Serve it chilled with ice cubes.


Notes:
Use 1/4 cup of jiggery instead of sugar.
Take cumin seeds and dry roast it on the pan till you sense the aroma. Grind it into fine powder.
Black salt is pink in colour and is easily available in Indian grocery stores. I used Indian Black Salt.
The raw mangoes I get in the UK are very small in size (you can see in the pictures). You can use 2 large size mangoes.

Serving suggestion:
This makes as a great appetizer drink for summer parties.
Use the leftover in popsicle or kulfi moulds and serve it as lollies.
This is also great to serve with pani puri or gol gappe.

Veg Manchurian (dry and with gravy): Indo Chinese: Street Food

$
0
0


Ever since I posted this pic on Instagram, all of you have been asking for the recipe. Well I can understand your craze, after all every Indian is fanatical for Indo-Chinese food. Chinese food in India is in Indian style but with Chinese spices. We use black pepper, ajinomoto, soy sauce, vinegar but make it super spicy to suffice our taste. Every hook and corner you will see vendors selling indo-Chinese food- noodles, chow mien, spring rolls, fried rice, manchurian and what not. In fact we love Chinese inspired meals so much that we even have Chinese khakra, Chinese dosa, Chinese tikki, Chinese samosa, Chinese pizza –the list is endless.


No matter what, everyone loves indo-Chinese food in India. Just say, let’s eat Chinese today and see the person’s face all lighten up-that’s what Chinese meal does to Indians.  We have restaurants catering only Chinese food in India; restaurants like yellow chilli, mainland china and five spice are super posh and expensive and then there are medium range restaurants like china town, china hut, china wok as well. We also have road side vendors selling Chinese dishes on small karts, so whatever your budget is, whatever ambiance you prefer, if you are in India you have to try our style indo-Chinese dishes.


Personally, I prefer the road style Chinese food. Imagine the row of stalls in the night with dim yellow lights. Rich families drive their luxurious long cars to these stalls and enjoy the food inside the cars; students are just happy and satisfied to have such tasty dish in their budget; some just stand at stalls and scoop into hot and spicy food and take pleasure in simple life. Serenaded by the constant stream of honking and foot traffic on one side and delicious smelling hawker on the other side-the scene is so lively, I tell you.

Indo Chinese meals that I have posted before are burnt garlic noodles, egg noodles, schezwan veggie noodles, whole wheat momos and schezwan ildi. Today it is the most popular indo-Chinese dish- Veg Manchurian. Machurian is made with grated veggies which is then deep fried. It can be eaten dry just like that or can be made with gravy or sauce (wet).

This is neither a healthy dish nor does this takes less time. Lot of time and ingredients is needed to make Manchurian- but don’t let that stop you from trying this dish. This is the best Manchurian ever, its spicy, garlicky and super rich in indo-Chinese flavours.


Ingredients:
(For balls)
1 and 1/2 cup grated cabbage/patta gobi
1 cup grated carrot/gajar
1/4 cup grated bell peppers/shimla mirch
¼ cup finely chopped spring onion/hari pyaz
1 green chilli chopped/hari mirch
2 tablespoon all purpose flour/maida
1/2 teaspoon black pepper powder/kali mirch
1 tablespoon chopped coriander leaves/dhaniya
1 teaspoon soy sauce
2 tablespoon corn flour
Salt to taste
Oil for frying
(For sauce)
2 tablespoon oil
1 tablespoon ginger chopped/adrak
1 tablespoon garlic chopped/lehsun
1 tablespoon finely chopped carrot/gajar
1 tablespoon finely chopped cabbage
3 tablespoons corn flour
1 tablespoon soy sauce
2 tablespoon tomato ketchup
1 teaspoon green chilli sauce
1 teaspoon vinegar
1 teaspoon sugar
2 cups water
2 teaspoons chopped spring onions for garnishing
Salt to taste


Method:
(for balls)
Heat oil in the wok for frying.
Mix cabbage, carrots, bell peppers, green chilli, spring onion, coriander leaves, soy sauce and salt. Keep aside for 5 minutes.
After 5 minutes, squeeze all the water from the veggies. Mix corn flour, all purpose flour and black pepper.
Make balls and deep fry in the oil. Fry till it is golden in colour. Drain on tissue paper and keep aside.
(For sauce/gravy)
Heat oil in a wok. When oil is hot, add ginger and garlic and sauté for 5 seconds.
Add finely chopped cabbage and carrots. Sauté for 5 seconds.
Add the remaining ingredients (except spring onions). Mix and let it boil for 8-10 minutes.
Add Manchurian balls in the sauce and serve.


Notes:
You can use ajinomoto or mono sodium glutamate but I have heard its not good for the body so I avoid it.
Fry balls on the medium heat so that they are cooked evenly on inside as well.
Always cook Chinese in the wok on a high heat. I used this Joyce Chen Carbon Steel Wok.
If you like thick sauce then add less water and more water for thin gravy.
Add more or less black pepper as per your taste.
I used Chings Green Chilli SauceChings Dark Soy SauceChings Chilli VinegarYou can use white vinegar as well.  

Serving suggestions:
They can be served as it is without gravy as starters or appetizers.
You can serve it as a side with plain rice or boiled noodles.
Serve with bellpepper noodles, egg noodles or fried rice.

Visit To Brixton Market

$
0
0


Now when the weather is fine (just fine) in London, we want to go out and explore new things. Brixton Market has been on our to-visit list for a long time, so we decided to visit Brixton village on the last weekend. When I checked the images and read about the village, I saw colours and lots of food stalls, I also read that it is one of the budget eating out places in London- I was excited.

We arrived a little after noon just before lunch. First impression was not good; there were hardly any food stalls, no music and very little crowd. No one made us taste the samples; no one welcomed us, no smiling faces. Then we head inside the village-the covered market. Colours and vintage-these two words came in mind. Lot of tiny cafes and restaurants with lovely sitting arrangement offering variety of food such as sandwiches, panini, cakes, curry, Caribbean drinks and what not. If food is not what you are looking for, then there is huge market selling all kinds of European, Indian, Asian, African, South American and the Caribbean stuff- From cheese to fish, from meat to bags, from fresh vegetables and fruits to Chinese medicines, from retro pieces to modern art :-)

What I liked:
  • Old era shops. There are many petite shops selling unique, rugged and different vintage retro things. Do go inside the shops and check them out. You might find something nice.
  • Cake shops: Ditch savory for a while and try cakes and pastries.
  • Mix of culture: The market is full of life, keep walking and you will find unique mix of cultures beaming up with energy.
  • Vegetarian food: There were many options for vegetarians as well. From freshly made sandwiches to panini to pasta. Thank god!

What I did not like:
  • Smell- Right in between the restaurants and cafes there are butchers shops and the smell of raw meat and fish was too over-powering for us.
  • Expensive- I heard that it is a budget eating out place, but the rates were just like any other chain restaurant or cafe in London. Pesto and cheese panini cost us £ 4.40 which is same in EAT or Prêt A Manger :-( 

Overall:
For me it was just Okay! If you are in London and love to try different markets then you must go, it is not bad for first time visit. If you are a non-vegetarian then you MUST defiantly visit this place-tons of options you see :)

Enjoy the pictures, I used my Motorola Moto G 2nd generation to click the pictures :)

Distress Vintage- love them :)

Mix of culture

Fancy Ramen Noodles??


Pesto cheese panini at San Marino


Oreo Milkshake ;)

Time to eat

Lets go to Africa :)

You can find more details about the market on http://brixtonmarket.net/


Mango Milkshake

$
0
0


Totally mad over mangoes this season! I am left with no stories related to mangoes that I can share with you. All I can say is I am done with mangoes this year, not going to buy anymore- all satisfied now ;-). Last mango stared at me every time I opened the fridge. I ignored and paid no attention to the poor lonely mango. Last weekend while I was cleaning the drawer (you know spring cleaning ;-), I found a packet of straws, some fancy twisty straws that I bought last year and totally forgot about it. That’s me, I like to buy things and then forget about it.

So I wanted to use the straws no matter what this summer, thus I decided to use the lonely mango and make some drink out of it- something too simple and straight forward. In the thinking process, my phone vibrated. Maa calling, the phone flashed. After chit-chatting about this and that, I asked her about the lonely mango. She answered promptly- make mango shake. Moms are the best :-)


Looking for Mango recipes? Check these out:
-Aamras
-Mango Lassi
-Mango Mousse
-Mango Chocolate Cake
-Mango Phirni
-Mango French Crepe Cake


I mean, what can be simpler then milkshakes? Just put everything together, pulse the blender for few seconds, pour in the glass and enjoy-that’s it. Mango milkshake is a very popular thing in India, even the roadside vendors sell it. There are two ways in which milkshake can be prepared, one- thick milkshake, where you add more fruits and less milk, second- thin milkshakes , more milk and less sugar. For me, an ideal milkshake has more milk and less fruits, you may or may not add sugar depending on the sweetness of fruit.

Milkshakes that are too thick reminds me of smoothies, it’s not a milkshake if it doesn’t have more milk-right? So this is how you make my style Mango Milkshake


Ingredients:
1 mango
1 glass milk (I used the same glass you see in the picture)
1/2 teaspoon sugar
4 ice cubes
4-5 saffron threads (optional)

Method:
Remove the pulp from the mango. Discard the seed.
Put mango pulp, milk, sugar and ice cubes in the blender and blend it for 10 seconds.
Pour in 2 glasses and garnish with saffron threads.


Notes:
You can adjust sugar as per your taste and sweetness of mangoes.
You can add more milk more thick milkshakes.
Feel free to add icecream, vanilla essence, cardamom (ilyachi), saffron (kesar).

Serving suggestion:
This is filling and a great way to include both milk and fruits in your diet. Have it as breakfast, evening snack or post workout meal. Great for kids as well.
Increase its nutrients value by adding flax meal, chopped nuts or dried fruits in it.
Serve with dollop of chocolate icecream and chocolate sauce ;)


Anda Bhurji: Egg Bhurji: Bhurji Pav: Bhurji Paratha: Mumbai Street Food

$
0
0


This movie called Selfie, has changed a bit of me. Sometimes you just need to be yourself; the people around can make you feel inferior or superior but you must be YOU. Do what you want, do what you think is right-you cannot please everyone every time. People will judge you, advice you but you don’t have to care. You decide to be or not to be, to wear makeup or not; to be a stay at home mom or a working mom; to wear skirts or cover your body; to be with boys or girls; to have a tattoo or pierce your body.  Simple, right? Who are they to tell you when to have kids, why not to be a house wife, why to go to office? It’s your life and only you know and understand you :-) Just check the video out and I am sure you will love it too :).

After moving to London; I wanted to stay at home, give time to my newly married life, explore the lovely city and just relax. Cooking became my addiction and passion and that is when this blog was born. When people asked me what I did whole day sitting at home? I explained them, I keep myself busy – I read, I cook, I blog, I do food photography, I take care of my house etc etc. Oh so you don’t work, you don’t get a job in London, they would ask me. One day I wrote a post on confessions of food blogger, and now when people ask me, I just give them the link.


I am vegetarian by choice and in fact no one in my family eats meat or fish. My dad eats eggs and so do I. My in laws eat simple food without onion and garlic. That’s their choice, when I was getting married, I was asked to shun eggs. I bluntly refused. Mr. Husband understood and I was allowed to cook eggs at home. He travels a lot for his office purposes, being a vegetarian he sometimes can’t get anything to eat and there are times when he has to survive on canned juices for the whole day. I knew something had to be done.

One day, I decided to make Anda Bhurji. I presented anda burji as paneer burji because it is very much like paneer bhurji in texture and colour. That is how he began eating eggs and now when he is in some foreign land he atleast can eat an omelette ;-)


Anda bhurji is scrambled eggs but Indian style. In it goes Indian spices, veggies. In Mumbai you get anda burji with pav (pull part roll buns) on streets and some restaurants also sells bhurji parathas- both the combinations are tasty. The roadside vendors in Bombay make it on pav bhaji tava and that is what gives it a unique taste. Garlic, onion and tomato are the must-to-go veggies in Anda Burji and you can also use peas, capsicum as well.

Looking for more Bombay recipes? Check these out:


Anda bhurji is a wholesome filling meal. You can make it for breakfast, brunch, lunch or dinner. It takes care of your nutrients and gets ready in no time-what else can you ask for.


Ingredients:
2 large eggs
5 tablespoons milk
1 medium size onion chopped
1 medium size tomato chopped
1/4 cup capsicum chopped
2 cloves garlic minced/grated
1 tablespoon chopped coriander leaves
1 green chilli chopped
1 teaspoon lemon juice
1/4 teaspoon red chilli powder
1/4 teaspoon black pepper powder
Salt to taste
1 teaspoon pav bhaji massala (notes)
1 tablespoon oil
1 tablespoon butter


Method:
Heat oil in pan. When hot, add garlic and sauté for 10 seconds.
Add onions and capsicum. Cook till onions turn pink.
Add chopped tomato, lemon juice and green chilli. Mix in salt, red chilli powder, pav bhaji massala, black pepper powder. Mix and cook covered for 1 minute or till tomatoes become soft.
In the mean time, crack eggs and beat them in a bowl. Mix milk and beat again till forthy.
Mix eggs in the pan. Keep stirring and scrambling the eggs.
Add butter and coriander leaves. Mix and serve.


Notes:
You can pav bhaji massala in any Indian grocery store. I used Everest Pav Bhaji Masala.
I have used three peppers- green chilli, red chilli powder and black pepper. This is a spicy dish, please adjust the heat level as per your taste.

Serving suggestion:
Serve with pav or bread.
Goes well with plain parthas. You can serve with palak partha, methi thepla or daal partha as well.
The burji can be stuffed into parathas as well. (Recipe coming soon).
Fill in between two slices of bread and make a sandwich out of it.

Beans Ki Subji: Indian Style Beans Stir Fry: Healthy Side

$
0
0


This is a simple curry. 

Beans stir fry.

Any kinds of beans- broad, flat or green mixed with basic spices and you are good to go.


Long weekend is coming closer, which reminds me what are you guys doing? Summer parties, BBQ or spring cleaning? Whatever it is, if a time comes when you are in no mood to cook or just want to have simple meal or wish to have a healthy side with your main dishes then you MUST try this stir fry. When I made this subji, I literally had 15 minutes. Quickly I whipped the complete dinner- yellow dal in pressure cooker, steamed rice in microwave and this beans curry on the hob.


Looking for more Indian stir fry recipes? Check these out.


This Beans ki subji is my everyday kind of subji/ curry, I either pair it with mixed vegetable massala parthas or just have as a side with dal (lentil) and rice. No grating garlic, no ginger paste, no tomato puree –a complete fuss free subzi. Feel free to add potatoes to make aloo beans curry, I wanted to have it all healthy ;)

No more chit-chatting, got to go. See the recipe :)

Ingredients:
1 cup chopped beans (I used flat beans)
2 green chilli chopped finely
2 teaspoons oil
1/4 teaspoon cumin/jeera
Salt to taste
1/4 teaspoon turmeric powder/haldi
1/4 teaspoon coriander powder/dhaniya
1 teaspoon lemon juice (see notes)
1 tablespoon chopped coriander leaves


Method:
Heat oil in a pan. When hot, add cumin seeds, let it crackle.
Reduce the heat to medium. Add chopped beans and green chilli.
Add salt and turmeric powder. Mix. Cover and cook for 10 minutes.
When beans turn soft, add all the spices. Mix. Cover. Turn the heat off.
Let it sit covered for 1 minute. Garnish with coriander leaves. Serve


Notes:
You can use amchur powder (dry mango powder) instead of lemon juice.
Again, use any beans. No change in method.

Serving suggestion:
Serve with any Indian bread.
Serve as a side with rice and lentils (daal and chawal).
Great tiffin snack for kids. Just roll the subji in the parthas.

Baigan Ka Bharta: Eggplant Mash: Pressure Cooker Method

$
0
0


Did you notice the white and blue bowl? It’s a new purchase for just 25 pence each-great buy isn’t it? I can’t stop myself when I see blue, white and flowers. What did you do on the long weekend?

Today’s post is Baigan Ka Bharta, a very popular Punjabi north Indian dish. Baingan in English is known as aubergine, eggplant or brinjal and bharta means mash. There are many ways to make begun ka bharta but the most common is to smoke or roast begun on open charcoal fire, peel the burnt skin and mash it with fork. If you have less time in hand do take a look at my Microwave Baigan Ka Bharta.

Looking for baigan (Eggplant) recipes? Check these out:


Even though I love and prefer the burnt method but Mr. Husband doesn’t like that smoked taste and if that was not enough recently his sister told him the incident when she saw a huge worm inside the eggplant. Imagine you roast the brinjal and there is a worm inside, which you will mash and use in your bharta-eww, yuck!  So these days I prepare bharta using pressure cooker or as some call it the boiled method.

Let me tell you, this is a super easy and a quick method. You don’t have to clean the mess on the hob that aubergine leaves when you roast it and the taste is just awesome. Trust me you have to try this method-period! So you need to peel the aubergine, chop it into rings, put in pressure cooker and cook it on high heat till you hear one whistle. Don’t worry if you don’t have pressure cooker, just boil the chopped brinjal in the pan full of water, cook till it gets soft, discard the water and yeah that’s it.


Like authentic baigan ka bharta I too like to use ghee (Indian clarified butter) and lots of garlic, but feel free to use oil and less garlic. I use some whole spices as well and garam massala is a must ingredient in this recipe. Bharta or bhurta is served as side with makke ki roti but this can be served as a dip or spread as well.


We like to spread thick layer of baingan ka bharta on any Indian paratha, roll it like a cigar and bite into. If like London you are having sunny yet cool days then this spicy and garlicy baigan ka bharta is always a good idea. So, on weekend I made the complete meal methi moong daal, simple steamed rice, jowar ki roti and this bharta.


Author: Shweta Agrawal
Recipe type: Side, Dip, Spread
Cuisine: Punjabi, North-Indian
Serves-2-3

Ingredients:
2 large eggplants/baigun
1 medium size onion chopped finely
2 medium size tomato chopped finely
1 green chilli chopped finely
8 cloves garlic chopped roughly
1 teaspoon whole coriander seeds/dhaniya
1 dry red red chilli
1 bay leaf/tej patta
2 tablespoons ghee/oil
1/4 teaspoon cumin/jeera
2 pinch asafoetida/hing
1/4 teaspoon turmeric powder/haldi
1 teaspoon red chilli powder/lal mirch
1/2 teaspoon coriander powder/dhaniya
1/2 teaspoon garam massala (recipe here)
Salt to taste
1 tablespoon lemon juice
1 tablespoon coriander leaves chopped finely


Method:
Wash and peal eggplants. Chop into rings and pressure cook with 1/2 cup of water and 1/2 teaspoon salt on high heat for one whistle. Release the pressure and strain the water.
In mortar and pestle coarsely grind bay leaf, red chilli powder and whole coriander seeds.
In a kadai/pan heat 1 and 1/2 tablespoons of ghee. When hot, add asafoetida, cumin seeds. Let cumin seeds crackle.
Add the coarsely grinded spices. Turn the flame to low. Cook for 2 miniutes.
Add chopped garlic, green chilli and onion. Add pinch of salt. Cook till raw smell of garlic fades away and onions turn soft.
Throw in chopped tomatoes, red chilli powder, garam massala, coriander powder and salt. Mix and cook it covered for 5 minutes. After 5 minutes you will see that tomatoes have become soft and mushy.
Add boiled eggplants. With a help of fork mash eggplants till you get spread like consistency.
Add in lemon juice and leftover 1/2 teaspoon of ghee. Cover and cook again for 8 minutes.
Serve with chopped coriander leaves.


Notes:
While buying the baingan for bhartha, go for the ones which are light. A heavy brinjal indicates that there are ripe seeds in it and this may spoil the taste of the bhartha.
Always cook bharta on low heat.
You can use small eggplants or even Chinese (Asian) eggplants for this recipe.
This is a spicy dish; I used three kinds of chilli in this recipe. Please adjust the spice level as per you taste.


Serving suggestion:
Serve as side with parthas, puris, roti –basically any indian bread.
This is a great dip as well. Serve with chips, nachos or crackers.
Spread a thick layer on to your sandwich bread or pita pockets. Enjoy with patties and or salad.

Garlic And Mixed Herbs Focaccia: Italian Bread

$
0
0

Baking bread at home, hell yeah!

The madness of proofing the yeast, kneading the dough, letting it to rise and finally baking-oh that experience, that fresh aroma, that happiness of home baking-all blissful.

If you have tried baking bread at home you will know what I am talking about. The whole process is tedious (at times) and time consuming but when you break the homemade bread and bite into it, you know all your efforts are well paid off.


Looking for more homemade breads? Check these out:

I made Garlic and Mixed Herb Focaccia last Friday and shared this pic on Instagram. Some have asked for the recipe and my friends are already demanding to bake one for them :-). Olive oil is a must when making focaccia and no there is no substitute for olive oil. A good aromatic olive oil will bring out the best focaccia bread.  Focaccia is an Italian bread and there are hundreds variations for the recipe but the basic bread or dough recipe remains the same but you can change the toppings as per your taste and mood ;-). You can have tomatoes, garlic, olive oil, caramelized onions, nuts and even fruits as toppings.


Little about yeast:
To have a nice soft bread texture you need to have good quality yeast and proof it properly. I used Allison rapid yeast and I like it because it doesn’t smell weird. To work with yeast you need something sweet like sugar or honey and warm water. Hot water will kill the yeast and cold water will not activate the yeast. If like me, you don’t have a fancy thermometer to measure the right degree of water, here is the test you can do. Dip your finger in hot water and you should be able to tolerate the heat, anything more or less will not work-just warm is what you are looking for. Next add in yeast and sugar, stir and keep aside for 10 minutes. If you see bubbles and forth in the yeast mixture you are good to go, else try again.

Since I was pairing it with pasta in chilli pesto sauce, I chose to have Garlic, olive oil and lot of herb on top it. And I was so right, the garlic herb focaccia bread and spicy pasta is a pair made in heaven-period! This bread can be served with basically anything. You can serve it with pasta, lasagne or just dip in some olive oil. If you fancy a focaccia sandwich, slit the bread in between and stuff in pesto sauce and some vegetables-grill and enjoy.


Author: Shweta Agrawal
Cuisine: Italian
Serves: 2-3

Ingredients:
1 and 1/2 cup all purpose flour/maida
1 teaspoon rapid yeast
2 pinch sugar
1/2 cup water
1/2 cup olive oil
1/2 teaspoon salt
1/2 teaspoon black pepper
1 tablespoon mixed dry herbs
5 cloves garlic
1/4 teaspoon coarse sea salt (optional but recommended)

Method:
  1. Heat water in microwave for 20 seconds. Dip the finger and check water, it should we warm. Mix sugar and yeast in water. Stir and keep aside for 10 minutes.
  2. After 10 minutes when you see bubbles on yeast mixture, add all purpose flour, salt and 1/2 teaspoon mixed herbs. Mix and knead the dough.
  3. Mix 1/4 cup of oil in the dough. Keep kneading the dough till it is soft and springy.
  4. Grease one large bowl with 1 tablespoon oil. Put the dough in the bowl. Cover it with cling film and keep aside in warm surface for 45 minutes.
  5. After 45 minutes the dough should have risen, beat the air out and knead the dough again. Flatten the dough on a grease pan in to any shape (I shaped in oval). The thickness should be like of a pizza. Cover the dough with wet towel and keep in a warm place for 20 minutes.
  6. After 20 minutes, poke holes (dimples) on the dough. Cover and keep aside for 10 minutes. Till then preheat your oven at 190C.
  7. Prepare the oil. Peel the garlic cloves and chop it roughly. Mix black pepper and remaining dry herbs. Keep aside.
  8. Pour this oil mixture on dimples of the dough. Spread the oil mixture evenly without punching the air. Sprinkle the sea salt.
  9. Bake for 14 -15 minutes. The bread should be golden brown on top.
  10. Let the bread cool down before you cut. Enjoy.


Notes:
Keep your dough in a warm place. I always keep it in the oven. A friend of mine who lives in hills cover the bowl with blanket and keep it dark place-for her this trick works.
You have to use a good quality olive oil for a nice texture. I recommend Colavita Extra Virgin Olive Oil. 
Use active rapid yeast or also called as instant yeast. I used Allinson Easy Bake Yeast.
Mixed Italian herbs are easily available in any store. It is blend of oregano, thyme, rosemary and basil. I used McCormick Italian Seasoning.
You can use any particular herb as well. Rosemary is the most popular one.
Cover the bread with cling film and store it a room temperature. It will be good for 2-3 days.

Yak & Yeti Finsbury Park London: Resturent Review

$
0
0
You all know how much I complain about Indian food sold in restaurants here in London. I always grumble about fewer options in vegetarian dishes and the taste is just not Indian. When I was invited to a Nepalese Indian restaurant to be their guest and write a review, first thing that I checked was the menu. Veg momos I read, in the starters section and I was sold. You just don’t get momos in London and that too vegetarian momos-impossible!


Yak and Yeti, a neat and chic restaurant situated at Finsbury Park London is what I am talking about. On Saturday I and Mr. Husband reached there at 7.30 pm; Mr. Rahman the manager welcomed us with smile and we were asked to be seated. Beautiful dim light, well decorated tables with glasses, napkins, candle and flowers-ah nice! The ambience is simple and yet elegant and there are some lovely Nepalese paintings that will surely grab your attention.

After a detail look at the drinks menu we decided to order cocktails but then we were told they weren’t serving cocktails, frankly I was bit sad. A glass of Merlot Red Wine for me and Cobra Beer of him I told the waiter. Well who cares about cocktail when you get our very beloved Indian cobra beer-right? With that they served papadoms and three kinds of dips which were truly appetizing.


The menu is superb and you have many Nepalese and Indian dishes so we decided to have one Nepalese starter- Veg Momos (ofcourse!) and one Indian, their star selling Aloo Tikki Papadi Chaat. The presentation of momos just sets the mood, beautifully aligned momos with chutneys and salad- wow. Steamed, cooked and stuffed perfectly and tasted wonderful. Aloo Tikki Papadi Chaat a pile of three patties with dollop of tamarind chutney and yogurt dressing with sprinkle of spices and channa dal looked extremely inviting. It was cold and there was no papadi in papadi chaat-disappointing.


For mains too we choose each of Nepalese and Indian meals. After quick chit-chat with waiter we ordered Nepalese Zimbu dall, it had lot of garlic and if you like garlic it is a good buy. For Indian we had Karahai Paneer which was just okay -mild, sweet and nice. To pair along we opted for Saffron Rice which was fragrant steamed rice flavoured with saffron and garnished with fried onions and good old classic Garlic Naan.


We indulge in and enjoyed softly played Indian music in the background. We were already full but when desserts menu was handed over to me, honestly I couldn’t resist. I had Homemade Mango Kulfi which was good too, I just hoped it to be in kulfi shape and not scoops. Mr. Husband and had Irish Coffeewhich he totally loved.


Final thoughts- if you are vegetarian and is bored with simple boring choices in Indian food, do visit this place, they have many vegetarian options. No need to say, but this is one MUST visit to non-vegetarians; the menu is too vast :-). The service is bang on and the waiters smile at you-that’s a must-isn’t it? So here is the website-http://finsburypark.yakandyeti.co.uk/

Cost: ££
Cuisine: Indian, Nepalese, Tibetan
Location: London, Finsbury Park


Thanking Emerz and Yak & Yeti for inviting me at the restaurant. All the views are my own and I was not told or paid to write positive review. The food bill was compensated. 

Viewing all 124 articles
Browse latest View live