Quantcast
Viewing all 124 articles
Browse latest View live

100% Whole Wheat Pizza Dough: Thin Crust: Indian Atta


Happy June everyone!

Friday night was pizza night. Ever since I have learnt the way to work with yeast, I must admit I am little addicted to baking breads at home. Homemade pizza dough is a new feather in the hat. And moreover this is made with 100% whole wheat flour, indian atta-yeah Aashirwad or Pillsbury both will work perfectly fine for this recipe.

I know, as soon as you say pizza you think of calories, refined flour (maida) and lots of cheese; but I used whole wheat flour, very less cheese and good vegetable toppings which means lots of goodness without compromising the taste. You can use this basic whole wheat pizza dough recipe and make thin crust or thick crust; small medium or large pizza; decide your own toppings and have it piping hot, fresh right out of oven.

How much time does dominos, pizza hut or pizza express takes to deliver so called ‘hot’ pizza? 30 minutes? 40 minutes? Well if you have the dough ready, then this pizza will take only 12 minutes. Exciting? You don’t have to count the calories, or worry for you kids’ health- it will be like indian bread (roti or paratha) with tons of veggies and the amount to cheese you feel is right. Smiling? Happy?-I am sure you are.

What more, I bring before you step by step pictures so that you understand well. Please please and please dont keep yourself away from having pizza- this is the Best Whole Wheat Pizza Dough.

Author: Shweta Agrawal
Cuisine: Italian
Makes: 2 meduim size thin crust. Or 1 large thin crust.

Ingredients:
1 cup whole wheat flour (I used Indian Aashirwad brand)
1 teaspoon rapid instant yeast
1/4 teaspoon sugar
1/4 cup water
1 teaspoon basil (optional)
Salt to taste
2 tablespoons olive oil
5 tablespoons water


Method:
Heat water in microwave for 20 seconds. Water should be warm. To it add yeast and sugar. Set aside for 10 minutes or till you see yeast bubbled and frothy. (pic 1)
Next, sieve flour and salt in the yeast bowl. Knead the dough and keep adding 1 tablespoons of water at a time. (pic 2 and 3)
To the dough at 1 tablespoon oil and basil. Knead the dough for good 8 minutes. The dough should come together, must be soft and springy. (pic 4 and 5)


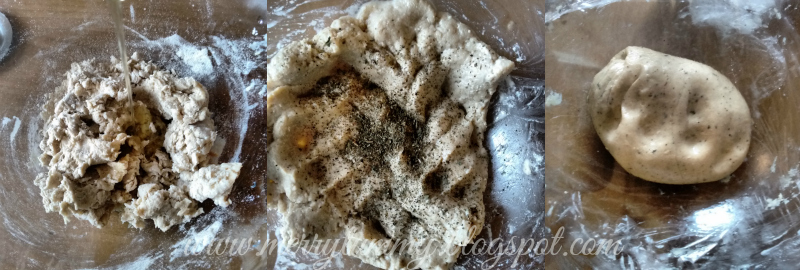
In a clean bowl add 1 tablespoon oil. Take the dough and coat it with olive oil. Cover the dough with cling film and keep aside in a warm place for 40 minutes. (pic 6)
After 40 minutes, the dough will be doubled in size. (pic 7)
Divide the dough in 2 equal parts. Take a pizza pan or a baking sheet. Grease the pan with some olive oil.
Preheat the oven 190C. 
Start rolling one part of pizza dough. I rolled into very thin crust. Place the rolled dough on the pan. Pinch the sides so that you have risen crust. Poke holes with fork on the rolled dough. (pic 8)


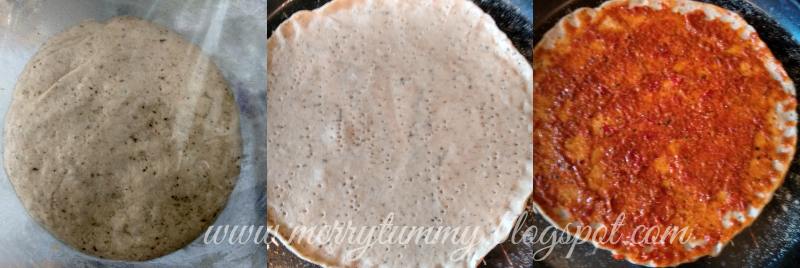
Spread any pizza sauce, cheese, toppings. Bake for 8 minutes at 190C.  (Pic 9 and 10)

Reduce the temperature to 180C and bake again for 4 minutes. The cheese must have melted. Cut and serve. (pic 11)


Notes:
You can freeze this dough. Put the dough in ziploc bag and freeze. When you want to use it, defrost and roll it out.
I made 2 thin crust (medium) sized pizza. You can use to make any size and type crust pizza.
Keep your dough in a warm place. I always keep it in the oven. A friend of mine who lives in hills covers the bowl with blanket and keep it in the dark place-for her this trick works.
You have to use a good quality olive oil for a nice texture. I recommend Colavita Extra Virgin Olive Oil.
Use active rapid yeast or also called as instant yeast. I used Allinson Easy Bake Yeast.


Roasted Pomegranate and Orange Lemonade: Summer Cooler: Indian Touch


Some days just call for drinks.

Summer coolers.

Citrus sweet sips.

Saturday was that kind of day.

I don’t want to go on and on today so I am keeping things pretty simple.

I made us one of the best classic summer drinks and I put my own little spin on it… AND, I made it just a bit healthier too!! YEAH!!

Lemonade is what I am talking about.

Roasted Pomegranate and Orange Lemonade.


If like me you tend to pick up lots of oranges and then wonder what to do, well this is what you must prepare. This lemonade is not overly sweet or tangy- it’s just perfect in balance. And the fruits are oven roasted. Roasting fruits is a great way to bring out their natural sweetness. The flavour profile intensifies and you are left with something so simple yet so elegant, you won’t believe your taste buds. Next, all is straightforward- some lemon juice, black salt and homemade chaat massala- mix mix mix! Oh yes! - It’s chilled, thirst quenching, all natural, fresh and nutritious.

Looking for more summer drinks recipes? Check these out


Oh yes pomegranates or anaar as we say it Hindi is a bag full of good nutrients and oranges or santra is another fruit packed with goodness-so why not mix it both and have a glass of summer cooler (sharbat) in no time. If you are having guests at home or just want to ditch ready made syrups or cold drinks then this recipe is a great change. Trust me, this is a lemonade recipe but with Indian-western twist which everyone will love. Oh you can thank me later.

Bring on summertime sippin!

Author: Shweta Agrwal
Serves: 4 tall glasses

Ingredients:
1 pomegranate/ anaar
2 clementine oranges/santra
2 tablespoon lemon juice
1/2 teaspoon chaat massala (recipe here)
1/4 teaspoon black salt/kala namak
1 tablespoon sugar
1/4 teaspoon salt
1 glass water
Ice cubes to serve

Method:
Preheat the oven at 200C.
Peel the pomegranates and keep the seeds aside. Peel the oranges in wedges, discard its seeds.
Take a baking sheet, line it with foil. Put pomegranate seeds and orange wedges on it. Sprinkle salt.
Put it in the oven for 10 minutes. Let it cool down.
In the blender add water, chaat massala, lemon juice, salt, sugar and roasted fruits. Pulse everything together.
Sieve the blended juice. Discard the pulp. Serve the juice with ice cubes.


Notes:
Do not over roast the fruits, else it will turn bitter.
You might need to add more or less sugar and lemon juice depending on sweetness and sourness of fruits.
Serves 4 small glasses or  2 tall glasses.
You can add mint leaves too for garnishing.
Black salt is pink in colour and is easily available in Indian grocery stores. I used Indian Black Salt.

Serving suggestions:
Serve as side with any spicy snack- corn cheese patties, baked Mexican potatoes or burnt garlic pasta.
Make it 2 days ahead and serve in fancy glasses and straws at parties.

One Bowl Chocolate Brownies: With Eggless Option: Upper Crust Cafe Style


Ummm!, Look what I baked today :)

Crusty on the top, soft and gooey inside....oh these brownies......!

Weekend just screams for brownies. No matter which part of world you are, having summer or winter, brownie is the thing that adapts to any circumstances. Cold night or a rainy, pour some hot chocolate sauce and you are all set. Sunny afternoon or scorching heat,   pop scoops of ice-creams and you are good to go. Thats what, chocolate doesn’t ask silly questions, it just understands.

Looking for more brownies recipes? Check these out:

This is One Bowl Brownie recipe and thus you don't have to bother about the mess and washing those extra bowls and plates-bonus! I come from a small town in India, and I never knew about brownies, so during summer vacations when we visited naani ka ghar in Ahemdabad we used to taste all pastries, cakes and cookies that we saw on television.


If you have been to Gujarat you would surely know about Upper Crust, a cafe cum restaurant. It was there where I had brownies for the first time. Dense, moist and fudgy brownies served on hot sizzling plate, topped with scoops of vanilla ice-creams and generously poured chocolate sauce. One bite and it takes you to a place where chocolate dreams come true :) These brownies are sure shot attempt to those brownies ;)

Coming to today’s post. Yesterday Mr.Husband, to my surprise got some fresh roses. So it’s like summer in the house, colourful roses-red, yellow and pink sitting on the windows and corners my house making me feel alive and fresh. Just as a thank you I decided to bake these brownies. These are super chocolaty brownies and there are some variations you can do with this recipe (see notes).

These brownies stay well for 1 week so they are good to carry along while travelling. If you want, you can pack these brownies in some fancy elegant box and gift to your friends and relatives, nothing beats a homemade gift.  Having a summer party? Don’t know what to serve for dessert? Guests coming over? Whatever the question is, just bake these brownies and serve it as the last meal. Pair with ice-creams, chocolate sauce, nuts and sprinkles. These brownies, oh these brownies!

Author: Shweta Agrawal
Makes: 8-10
Ingredients:
Unsweetened Cocoa powder- 1/2 cup
Unsalted Butter- 1/2 cup
Sugar- 1 cup
Eggs- 2
All purpose flour- 1/4 cup
Vanilla extract- 1/2 tsp
Bitter sweet/ Dark chocolate, broken into small pieces- 1/4 cup
Salt- a pinch

Method: 
Preheat the oven at 170C. Grease the pan. I used glass rectangle pan.
Take microwave safe bowl and heat cocoa powder and butter on high for 20 seconds. Let it cool for 15 seconds.
To it add sugar and mix. Mix till sugar is half dissolved.
Add one egg at a time and mix well and quickly. Add another egg and mix.
Finally add in all purpose flour, salt and fold. Just mix don’t over mix.
Add in chopped chocolate. Pour the mixture in the pan.
Bake for 30-35 minutes or till when toothpick inserted in between comes clean.
Cool on a wire rack for 30 minutes. Cut and store in airtight container for 1 week. Warm for 5 seconds in the microwave before you serve.


Notes:
I used 70% dark chocolate. You can use less bitter one as well. Even Cadbury dairymilk. I used Green & Black's Organic Chocolate BarImage may be NSFW.
Clik here to view.
.

To make eggless brownies, mix 2 tablespoons of flaxmeal with 4 tablespoons of water. Set aside for 10 minutes and use. Read more about it here.
Use a good quality unsweetened cocoa powder. I recommend Hershey's Unsweetened CocoaImage may be NSFW.
Clik here to view.
Don’t let sugar dissolve completely in the batter because sugar caramelizes and gives you those chewy brownies. Use brown sugar for better taste.
You can use chopped nuts such as walnuts, almonds or cashews in the recipe.
Don't panic if brownies don’t rise-they are supposed to be like that.

Serving suggestions: 
Serve with milk or coffee.
Pair with vanilla icecreams or chocolate icecreams. Pop some nuts or sprinkles on the top.
Serve with hot chocolate sauce or caramel sauce. Dust some icing sugar or cocoa powder for extra touch.
You can also have it topped with whipped cream and chopped fruits such as strawberries, bananas or raspberry.

Malabar Vegetable Biriyani: Guest Post By The Big Sweet Tooth

One of the charms of blogging is to make a new friend every day. How we live in different countires, come from different backgrounds but our passion for cooking and food brings us together. Todays guest is one such passionate food blogger. Rafeeda or Rafi as I call her is one the most supportive blogger you would come across-ever. She is a busy working mom and yet never forgets to comment on your blog and all social networking sites-if you know her, I am sure you must agree with me 100%.

When I asked her to be my guest she happily agreed. Rafi, you are one of THE most sweet person, there is something every postivite about you that I truly respect. Keep up the good work. Some recipes that I would love to try from her blog are Fluffy Biscuit PuddingElyanchi, Carrot Rice Kheer and ofcourse many more. Today, as a guest blogger she bring before us Malabar Vegetable Biriyani and I am so happy to announce Merry Tummy loves The Big Sweet Tooth.


My interaction with Shweta started with my participation in the Saturday Snapshots. From then on, it has been a very cordial and warm relationship. I have always liked her frank comments for my photographs, whether positive or negative. She always would give ideas to improve on the overall blogging experience. I was very happy when she asked me for a guest post – especially when I love her pictures and I feel inferior as far as mine is concerned! I always feel that my pictures are very normal, especially knowing how lazy I am to improve on them. I know that if I put my heart in, I would be able to improve quite a bit but somehow my laziness and lack of time creeps in. So when she asked me for a guest post, I was determined to try to do the best I would be able to do!

A little introduction to myself – my name is Rafeeda and I blog at “The Big Sweet Tooth”. My blog name is synonymous to what I am actually – a big sweet tooth! I love sweet stuff in any form and love to whip them up, from smoothies to desserts! I am based in the multicultural UAE, very well known for the city of Dubai, and have been a part of this colorful city almost all my life. My foodie instincts have been boosted by the innumerable chai shops and shawarma outlets that are available in every nook and corner of this country! I love to cook and bake as it releases a lot of stress, thanks to my busy life as a working mother, to two beautiful girls. 

The first thing Shweta reminded me of while working on the guest post, was that it must be vegetarian! Actually, that was the first thing that had popped in my thought as well! At the moment, I had nothing in my mind apart from making some biriyani with loads of vegetables! In our household, like a typical non-vegetarian family, biriyani is never associated with vegetables or even eggs! It is quite disappointing that I have never cooked a biriyani with vegetables, apart from this Nawabi style biriyani and I was hell bent at making one for Shweta, for her post. 


Yes, I did have to make a non-vegetarian side, thereby increasing my work in the kitchen, but the satisfaction from having made this biriyani was amazing. I referred to the recipe from “Classic  Malabar Recipes” by Faiza Moosa and adapted it to our taste and my previous experience with other biriyanis. I must say that this was a really flavorful biriyani, which received a very good feedback from the folks at home and was wiped off, much more than my expectation! The list of ingredients may look scarily long, however it is a breeze to make, once all the chopping is done! Off to the way I made it…Malabar Vegetable Biriyani

Serves 4

Ingredients:
2 potatoes, peeled and cubed
2 carrots, peeled and chopped
2 cups chopped french beans
1 cup frozen green peas 
1 tbsp ghee
2 cardamom
1 bay leaf
1 pc cinnamon
6-10 peppercorns
1 star anise
2 cloves
1 large onion, sliced
4 green chillies, slit
1 tbsp ginger garlic paste
2 meduim tomatoes, chopped
1/2 tsp turmeric powder
1/2 tsp red chilli powder
1/2 tsp Kashmiri chilli powder
1/2 tsp fennel powder
3 tbsp yogurt
Salt to taste
2 cups basmati rice
A pinch of turmeric
For dum:
3 tbsp ghee
2 small onions, sliced
8-10 cashew nuts
10-15 raisins
3 tbsp chopped coriander leaves
3 tbsp chopped mint leaves
2 tsp garam masala
1 tsp pineapple essence (optional)
1 tbsp rosewater

Method:
  1. In a saucepan, boil lot of water. Add the potatoes, carrots and bean and boil till the vegetables
  2. are 50% done. Add the frozen green peas and cook further till they are cooked up to 80%, ie. When you bite in, there would be a slight rawness. Drain the vegetables and set aside.
  3. In a large saucepan, heat ghee. Fry the whole masalas for a couple of minutes. Add in the onion and green chillies and sauté till it becomes soft. 
  4. Add the ginger-garlic paste and cook till the raw smell is gone. Add the tomatoes and cook till the tomatoes get totally mashed up. 
  5. Add in the masala powders and sauté till it gets a nice dark color. Add in the cooked vegetables and yogurt and mix well till incorporated. 
  6. Add in the salt and cook for a couple of minutes. Switch off. 
  7. Meanwhile, wash the basmati rice several times till clean. Boil water in a large pan with a pinch of turmeric and salt. 
  8. Add the rice and cook for around 10 minutes or till the rice is 80% cooked –when you bite a grain, there would be a little grainy taste. Immediately drain the rice and wash in cold water. Set aside. Let us do the dum ingredients. 
  9. Heat ghee in a fry pan and fry the onions till crisp. Drain and set aside. Fry the cashew nuts and puff up the raisins. Drain and keep along with the fried onion. Heat a tawa for doing the dum. For a detailed step-by-step of how to do your dum, you can refer to this post of mine! 
  10. On top of the prepared vegetable masala, sprinkle in half of the fried items, along with half the coriander and mint leaves, as well as the garam masala. Put the rice on top of the masala. Sprinkle in the rest of the remaining dum ingredients. 
  11. Drizzle the ghee used to fry the onion, along with the rose water and pineapple essence, if using. Cover the saucepan tightly and close the lid. 
  12. Keep on dum for 15-20 minutes on medium-low flame. Switch off and leave undisturbed for another 15 minutes. Take off the foil cover and give in a nice mix with a spatula, ensuring that the rice doesn’t break and the vegetables are intact.
  13. Serve hot with some pickle, chammanthi and raita.

Thank you from Merry Tummy :)

If you wish to be my guest please send me an email at agrawal.shweta.n@gmail.com

Leftover Paratha, Roti or Chapati Chips: Chapati Chips: Paratha Chips


Leftover paratha, roti or chapati? Wondering what to do? How about chips? Yes, you can use leftover or parathas or chapati and make crispy chips with it. My mother has been doing it for years and the result is so amazing that you will be hooked.

Infact we enjoy these paratha chips so much that sometimes I deliberately roll extra parathas so that I can make chips out of it. Yes these are sooo good.

All you need to do it is cut parathas into any shapes-triangles, strips or squares and fry them-yup that’s it. Serve these chips with hot cup of tea or just like that. It serves as a great side with chutney or riata as well.

Ingredients:
Leftover paratha, roti or chappati
Oil to fry
Salt to taste
Red chilli powder to taste

Heat oil in a pan.
Cut paratha into any shapes.
When oil gets hot fry the paratha until crisp on medium-high heat.
Sprinkle salt and red chilli powder. Let it cool down before serving.


Notes:
You can also use chaat massala instead of salt and red chilli powder.
This stays well in a airtight container for 1 week.

Serving suggestions:Serve as a teatime snack.
Serve as a side with dips such as hummus, tomato chutneyor riata.

Roasted Kiwi Raita: Summer Dip: Side for Rice Dishes


Long sunny days are what I am seeing in London these days, not that I am complaining. Infact we both are enjoying every bit of it. Evening walk by the river, flowers in the house and then did this barbeque in the balcony on Sunday. Isn't it a great idea of use and throw disposable barbecue kits? Once the paneer tikka was done on bbq the coals were still warm and burning and thus I decided to roast fruits on it. I only had kiwi in the fridge and with no further thoughts I smoked it on leftover heat of charcoal.

Roasting is a simple that gives you elegant results. Roasting brings out the natural sweetness from fruits which just intensifies the taste to another level. Once the kiwis were roasted I had no idea what to do with. I wanted to something nice with it but had very little time in hand. While Mr. Husband was preparing simple pulav that day for dinner, it was then it struck me to put together burnt kiwis and yogurt and craft riata.

Looking for more roasting recipes? Check these out:
Fennel Roasted Cherry Tomatoes


Riata is condiment made with yogurt (dahi) used either as a side or dip. It can be made with or without fruits and vegetables and is then seasoned with simple spices. Roasted Kiwi Riata is no exceptional, it is just a mix of roasted kiwis, mint leaves, salt and sugar. There is no thumb rule that you have to follow in this recipe, you can use black salt, chaat massala, red chilli powder, chopped green chillies or roasted cumin powder as well. Make it as per your taste but if you roasted kiwis the riata will taste just amazing.

Another great thing about this riata is that it super healthy and can be paired with anything. Serve as dip for nachos, chips or crackers. Serve in pita pockets with kebabs or potato patties. Great side for rice dishes such as  methi mutter pulavbasic biryani, corn rice or mixed capsicum rice.

Author: Shweta Agrwal
Cusine: Indian, Pakistani, Bangladeshi

Ingredients:
1 cup yogurt
3 kiwis
Salt to taste
1 teaspoon sugar
2 teaspoon mint leaves chopped

Method:Roast kiwis on fire directly. Else line a baking sheet with foil. Grill in the oven at 200C for 10 minutes. The skin of kiwis should turn dark and pulp should be soft. Let it cool down. Peel the skin.
In the blender put yogurt, kiwi pulp, salt and sugar. Blend into smooth paste.
Garnish with mint leaves. Serve.


Notes:
I used low fat yogurt, but feel free to you use any.
If you like spicy dips, feel free to add black pepper powder or chopped green chillies.

Serving suggestions:
This is a dip, so goes well with nachos, crackers, chips or biscuits.
I like to sometimes have it as a side with mixed vegetable paratha, bombay tava pulav or baked potato wedges.
To complete the meal you can use this with salad and vegetable kebabs in pita pockets.


One Bowl Chocolate Cake: Butter and Oil Free: Moist Chocolate Cake: Celebrating 3rd Blog Anniversary


Happy news, Merry Tummy turned 3 years old,
    every day a new recipe and story will be told.
Passion for cooking and photography is what you see here,
    all I have is happiness in this blogosphere.
A journey of curries, cookies and cakes,
    and the tale of snacks and tea time breaks.
Friends, readers and family-all those who loved my space
    I promise to improve every day, just stay at my place.

I wrote this poem (sort of) as my little blog turned 3 years old. Thanks everyone for all your support. ‘'To succeed you have to believe in something with such a passion that it becomes a reality''. This is just the beginning I am sure the best is yet to come. To celebrate this occasion I planned a chocolate cake. A cake that is moist and soft, a cake that is healthy, and a cake that can be made in one bowl. This is by far the moistest cake I ever had and its oil and butter free too- bonus.


One Bowl Chocolate Cake which is butter and oil free. For frosting too I used chocolate and milk, no butter or cream. Trust me this cake was sooooo scrumptious that you must make it NOW. No mess, no extra bowls and fewer calories. How happiness and celebration can take place without chocolate indulgence. Never, right?

I used my Home Basics Fluted Cake Pan to bake this and just poured chocolate ganache on the top. You can ofcourse decorate it nicely and neatly. See these 5 frosting/icings recipes that would go very well with this cake. So here is how to make this.

Ingredients:
1 cup sugar
3/4 cup all purpose flour/maida
6 tablespoons unsweetened cocoa powder
3/4 teaspoon baking powder
3/4 teaspoon baking soda
1/2 teaspoon salt
1 egg
1/2 cup milk
1 tablespoon vanilla essence
1/2 cup boiling water

Method:
Grease the cake pan with some oil or butter. Dust with all purpose flour and keep aside.
Preheat the oven at 175 C.
In a large mixing bowl beat sugar and egg. Beat sugar starts melting and egg becomes frothy.
Sieve in the bowl all purpose flour, salt, baking powder and baking soda. Add half the milk and mix for 20 seconds.
Add vanilla essence and remaining milk. Mix the batter till there are no lumps.
Finally add the boiling water. Mix for 1 minute.
Pour the batter in the pan. Bake for 40 minutes or till the knife inserted in centre of the cake comes out clean.
Let it cool on the wire rack for 10 minutes. Remove the baking pan cut and serve.


Notes:
Make sure all the ingredients are at room temperature.
Water will make the batter very runny, but do not panic it is supposed to be like that.
Chocolate Ganache recipe is here.
Use a good quality unsweetened cocoa powder. I recommend Hershey's Unsweetened Cocoa.
You can use brown, white or castor sugar.

Bell Peppers, Sweet Corn and Tomato Cheese Thin Crust Pizza: Whole Wheat Dough: Vegetarian Pizza


Pizza, popcorn, beer and movie- ah the best combination-ever!

Have you ever met someone who doesn’t like pizza? Me neither. How about these interesting pizza facts then?
  • The average pizzeria uses roughly 55 pizza boxes per day.
  • 36 percent of all pizza orders want their pizza topping pepperoni
  • 94 percent of Americans eat pizza regularly.
  • Cheese wasn't added to pizza until the late 1800s.
  • The largest pizza in the world was made in 1990 at Norwood Hypermarket in South Africa. For the pizza, they used 500 kg of flour, 800 kg of cheese and 900 kg of tomato puree. The pizza was measured 37.4 meters, enough to secure an entrance in the Guinness Book of Records as the largest pizza ever.
And making pizza is so easy peasy if you have crust or base ready. Now do you remember two weeks back I posted this 100% whole wheat pizza dough recipe? I saved half of the dough in the freezer and this Sunday turned into quick thin crust pizza. Bell Peppers, Sweet Corn and Tomato Cheese Thin Crust Pizza is the best vegetarian pizza you will ever have. Ofcourse you need to be fond of thin crust, we both are huge suckers of thin crust pizza, I have also made thin crust New York Pizza before. Honestly, thick crust or normal crust pizza tastes like cooked dough to us;-)


I used red chill pesto as pizza sauce but you can use roasted garlic bell peppers sauce, roasted tomato chutney or even ketchup. For toppings I threw in some chopped chunks of capsicum, frozen corn and roundels of tomatoes. You can use any other veggies like zucchini, aubergine, onions, olives, jalapeno, peppers or even green leaves like spinach, basil or arugula. I opted for mix of mozzarella cheese and cheddar cheese, but that again depends on your choice. You can choose blue cheese, feta cheese or even parmesan cheese. That’s what I looove about pizza. You can add in anything that your mind and heart needs at that time.  Pizza doesn’t ask silly questions, it just understands.

Ingredients:
1/4 cup chopped bell peppers
4 tablespoons sweet corn (I used frozen)
1 tomato chopped into rings
1/4 cup mozzarella cheese
1/4 cup cheddar cheese
1 teaspoon oregano
1/4 teaspoon black pepper powder
1 tablespoon cornmeal (see notes)

Method:
Preheat the oven at 190C.
Sprinkle corn meal on the pizza pan or tray.
Roll out the dough into thin crust medium size. Transfer the rolled dough on the pan. Prick holes with fork.
Apply pizza sauce all over the base. I used chilli pesto sauce.
Arrange all the veggies on the base. Sprinkle salt, pepper and oregano.
Top the veggies with cheese. Pinch or fold the sides such that it looks like crust.
Bake for 8 minutes at 190C. Reduce the temperature to 180C and bake again for 2 minutes. The cheese must have melted and turn bubbly.
Slice and serve.


Notes:
You can make normal thick crust pizza too. Bake it at 180C for 10 minutes and then 170C for 5 minutes.
Cornmeal is optional, it helps to give nice crispy texture to pizza crust. You can grease the baking pan with little olive oil and bake instead.

Serving suggestions:
Serve pizza with any drinks. See drinks menu for ideas.
Make a whole platter. Serve pizza with baked sweet potato wedges on the side with kiwi yogurt dip.


Achari Gobi: Cauliflower With Pickle Spices: Side Dish


So, did you know Indian marriages are mostly arranged, when two strangers and their families meet, talk and decide to get their kids married. However ours was a bit different case, we met through families but before getting engaged we wanted to give each other sometime, get to know one another-long phone conversations, internet chats, Skype calls, sharing pictures and secret meetings and here we are.

Now here is the funny thing, we converse for hours about our lives, personnel issues, families, commitment and what not but we never talked about food choices- never ever! After marriage came in lot of surprises or shocks-whatever you call it. Initially it was irritating but slowly with togetherness we have now set in tune with each other’s choices. One of the best example will be how I started enjoying mangoes; you can read the whole story here.Or how he too loves spicy food nowadays the way I do.


But...some habits die hard. Some things you can’t wipe out from one’s mind. I tried hard, really hard but failed to make him fall in love with cauliflower dishes. I cannot eat or even cook Gobi/cauliflower when Mr. Husband is around. It happened once when he was eating gobhi sabzi and he saw a moving worm or keeda in it and rest as we say is the history. An apt equation that could explain his hatred towards gobi is- dislike for gobi = love for chocolate. Now you understand how serious I am? Sigh!

So whenever Mr. Husband isn’t around and is travelling for his office purpose, I bring this beautiful flower (phool) at home and treat myself *evil smile*. So once I made this spicy Kadai Gobi and the other time I cooked Punjabi Gobi Matar- do check them out. For today I prepared Achari Gobi (Cauliflower with pickled spices).

Achari or pickled spices are the mix of mustard seeds (rai), fenugreek seeds (methi), nigella  seeds (kalonji) and fennel seeds (saunf). These spices are not hot or spicy infact they are bitter in taste and have very strong aroma. You need to dry roast these spices and then use it, this then helps to give curry a very unique and piquant taste. I like to grind the roasted spices into fine powder, but you can use whole or coarse powder as well. This is a dry (suki) vegetarian side dish with indian breads such as puri, paratha or chapati and goes well with rice and daal as well.Don’t let ingredients list intermediate you, this curry is indeed easy and worth all the steps. Here is how to make Achari Gobi.

Author: Shweta Agrawal
Serves: 2-3

Ingredients:
1 medium cauliflower/gobi
1 whole red chilli
1/2 teaspoon mustard seeds/rai
1/2 teaspoon fenugreek seeds/methi dana
1/2 teaspoon fennel seeds/saunf
1/2 teaspoon nigela seeds/kalonji
1/2 teaspoon cumin seeds/jeera
1 onion medium size chopped finely
1 tablespoon ginger garlic paste
3 tablespoons yogurt/dahi
2 tablespoons lemon juice
1 teaspoon sugar
1 teaspoon red chilli powder (adjust as per taste)
1/2 teaspoon turmeric powder/haldi
1/2 teaspoon coriander powder/dhaniya
2 tablespoons oil + 1 tablespoon
Salt to taste
Coriander leaves to garnish
Kasturi Methi to garnish (optional)


Method:

  1. Cut cauliflower into florets. Wash and drain the water.
  2. Dry roast red chilli, mustard seeds, fenugreek seeds, nigella seeds and fennel seeds on a slow flame till aroma is released. Let it cool down. In the spice or coffee grinder, grind it to fine powder.
  3. Mix lemon juice in the above spice mix and keep it aside.
  4. Heat oil in a pan or wok. When hot gets hot add cumin seeds. When seeds crackle add ginger garlic paste and onions. Cook till onions are soft and raw smell of ginger garlic fades away. Turn the flame to slow.
  5. In a bowl mix yogurt with turmeric, coriander powder, red chilli powder and sugar. Put this mixture in the pan and cook covered for 5 minutes.
  6. After 5 minutes add grinded pickled mix. Cook covered for 2 minutes. The sauce must turn thick.
  7. In separate pan add 1 tablespoon oil. Add cauliflower florets and saute it for 10 minutes on a medium flame adding a pinch of salt until they turn light brown in colour. Transfer into a paper towel and keep it aside.
  8. Add cooked cauliflower in tomato sauce. Cook covered for 2 minutes. The spices must coat cauliflower. Check salt. Serve with chopped coriander leaves and kasturi methi.


Notes:
You can use green chillies instead red chilli powder. For dark red colour use kashmiri red chilli powder.
Agian, I like to grind my spice mix to fine powder. You can use whole or coarsely grinded spices too.
Kasturi methi is dried fenugreek leaves, it is optional. It is  is easily available in any Indian grocery store. I used MDH one.

Serving suggestion:
Goes well with any indian breads.
Serve as a side with rice and daal.
Just roll up in the parathas, or rotis. Great for tiffins and lunch boxes.

Panchmel Daal: Panchpuran Dal: Panchtatra Daal: Rajasthani Marwadi Dal: For Bati


There is always one man who will never hurt a woman and that is her dad, her father, her papa. A daughters first love is her father and I truly stand by this. I love my dad, he is my lifeline, I don't know what would I do without him. Even though we speak daily, I miss having morning tea with him, discussing about horoscopes in the newspaper. Telling him this that, having lunch together and then seeing him again for dinner. I don't need any special day to thank him, but since its father’s day, I decided to dedicate this post to him. 

Check out last year fathers day post- Kache/ Raw/ Green Tomato Chutney :)

My father is the one who holds me when I cry, scolds me when I am wrong, shines with pride when I succeed and have faith in me when I fall. He was a strict dad while we (me and brother) were growing up and we were really sacred of doing or telling something stupid in front of him. He never scolded us for bad results in exams or failing but he had his own rules like speak to everyone politely, don’t watch senseless Indian soaps (we were allowed to see KBC), don’t go outside home after 8 pm alone. He is the one who believes in society, social norms, god, and religion but is still cool. This I guess it is mostly the behavior of an Indian dad :)
Back then if my dad came to know that I take alcohol he would have been very angry and disappointed but now he is like a friend to me. I don’t hide things from him; I just know he will understand. Last year on my trip to India I had shared the drink with the three most important guys in my life-papa, bro and my husband; I still don’t believe I sipped alcohol in front of papa. But that’s about my papa he knows how to mold himself and understand his kids when time is right :) Simple living, high thinking :)

I am so unlike papa in terms of food choices, what he likes the best, I dislike the most. I am more like maa :) So growing up I never really liked the combination of daal roti (lentils and Indian flat bread or chapati) I was more daal chawal (lentils and rice) kind of a girl. Any daal in any form, just give him roti and he would be the happiest person on earth. Me and mom loved daal but just with rice. But something happened; I got married to a daal roti person, just like papa-huge sucker of daal roti combination. 


So every time we visit my home in India, my mom makes different kinds of daal for my husband and papa. This time she made Panchmel Daal or Panchpuran Daal or Panchtatra Daal which is the combination of five kinds of lentils. There is a Punjabi way to make it where you add lots of ghee and garlic but maa made it in authentic rajasthani style, a marwadi way. This daal is usually paired with baati (Rajasthani dish) and churma. 

To make the best panchmel daal you need:
  • To soak the lentils for atleast half an hour.
  • Pressure cook for 2 whistles. Grains must be visible, over mushy daal is not authentic marwadi daal.
  • Mix of 5 lentils which is bengal gram dal (chana dal), black gram (urad dal),yellow gram dal (moong dal), green gram dal (moong chilka dal) pigeon peas spilt and skinned (arhar, tuvar, toor, tuar dal). But even white urad daal, red masoor dal or moth beans work fine.
  • 5 whole spices- red chilli (sukhi lal mirch), bay leaf (tej patta), cumin seeds (jeera), fennel seeds (saunf) and mustard seeds (rai).
  • Ginger is must but garlic isn’t. You can garlic too, but it is not must.
  • And ghee, a good quality Indian ghee (clarified butter).
 This is a simple dal but the flavour values are truly amazing. You need basic indian spices and little time to cook this dal, cook slowly to have creamy and thick dal. I like to have with jeera rice and it is roti (as you know now) for Mr. Husband.

Author: Shweta Agrawal
Serves: 3-4
Cusine: Indian: Rajasthani: Marwadi

Ingredients:
2 cups of dal. Mix of equal quantities of:
bengal gram dal (chana dal), black gram (urad dal),yellow gram dal (moong dal), green gram dal (moong chilka dal) pigeon peas spilt and skinned (arhar, tuvar, toor, tuar dal).
4 cups of water
2 whole red chilli
1 bay leaf/tej pata
1 teaspoon cumin seeds/jeera
1/2 teaspoon fennel seeds/saunf
1/2 teaspoon mustard seeds/rai
1 teaspoon ginger minced or grated
2 green chillies slitted
1/2 teaspoon turmeric powder/haldi
1/4 teaspoon red chilli powder
1/4 teaspoon garam massala
1/4 teaspoon aesofetida/hing
3 tablespoons ghee
1 tomato finely chopped
1 teaspoon lemon juice
2 tablespoons chopped coriander leaves
1/2 teaspoon kasturi methi to garnish (optional)

Method:
Wash all the lentils. Soak in water for 40 minutes. After 40 minutes drain the water.
In a pressure cook add 4 cups of water, washed lentils, turmeric powder and little salt. Cook for 2 whistles.
In a wok or kadai heat 2 tablespoons ghee. When ghee gets hot add cumin, mustard seeds, fennel seeds and bay leaf. Break whole red chillies and add it too.
Add aseofetida, green chillies and minced ginger. Cook for 30 seconds.
Add chopped tomato. Mix in turmeric powder, garam massala, red chilli powder and salt. Cook covered for 1 minute or till tomato turn soft and mushy and you see oil appear on the edges.
Add pressure cooked lentils. Add lemon juice. Check salt. Cook covered on slow heat for 10-15 minutes. 
Just before serving add remaining 1 tablespoon of ghee.Garnish with chopped coriander leaves and kasturi methi.


Notes:
You can use other lentils as well, like white urad daal or red lentils.
If you don't like ghee, feel free to use oil. You can decrease the amount of ghee if you are a weight conscious person ;)
You can boil lentils in open pan as well, it will take more time. Pressure Cooker saves time and it is really worth investing in a good cooker if you like to cook Indian dishes.
Kasturi methi (dried fenugreek leaves) is easily available in any Indian grocery store. I used MDH one.

Serving suggestions:Serve with plain basmati rice, jeera rice or any indian bread.
Serve as a side with dry indian curries like gobi matar, gajar matar or bhindi pyaz.
Pair with bread sticks or bread and serve like a soup.
It will be a great combination if served with rajasthani baati.
Make a complete marwadi thali. Serve along marwadi aloo pyaz ki subji, marwadi lehsun chutney and bajre ka rotla.

Aloo Matar Ki Subji, Restaurant Style


Nothing beats home cooked food...better if it’s made by your mother. Agree? 7.30 pm and I was back from my accounts tuition class. Maa was in the kitchen, in a printed blue chiffon sari, cooking dinner for us. Very carefully she added spices and gave it a mix. Quickly she kneads the dough and started making piping hot parathas. Oh that moment, when I close my eyes, I can see it all. Quick boil in the curry and she gave a spoon and asked to taste it. I grabbed the spoon and tasted aloo mutter ki subji, she waited for my answer...with spark in my eyes I replied-maa its super yummy, just like restaurant, how do you cook it?  Those little moments between a daughter and a mom, I wish I could freeze them forever.

Years later, she taught me how to make Aloo Mutter ki subji, like hers. Every now and then when I cook this subji, I wish I was a young girl who could go back to those days again. That’s about cooking, it engulfs you in memories and then when you bite into it, everything becomes better. Restaurant style aloo mutter ki subji (potatoes and peas curry) is one of those memorable dishes that happens once a while in my kitchen...it is a not every day curry, you need time and patience to cook this.


So what makes a perfect restaurant style Aloo Mattar Ki Subji?
  • Consistency-it is not dry (sukha) and it is not very watery (rassewali, jholwali) either; it is the balance of two, where you add water only to coat the veggies.
  • Dried fenugreek leaves (Kasturi methi)- you have and have to serve this curry with sprinkle of  kasturi methi.
  • Ginger and garlic paste- this is a must too. For the authentic taste, you need to add ginger garlic paste.
  • Tomato puree- for the restaurant style, tomato puree is what you need; there must be no chunks of tomatoes.
  • Garam Massala- Garam massala is a hot spice mix and it is one of the most important ingredients to make the perfect restaurant style curry.
So to master the perfect taste, please follow the above steps- not that complicated-isn’t it? So, lets see the recipe.


Ingredients:
4 medium size potatoes, boiled and chopped
1/2 cup green peas/mutter boiled
2 medium size tomatoes
1 teaspoon ginger-garlic paste
2 tablespoons oil
1/4 teaspoon asafoetida/hing
1 bay leaf/tej patta
1 teaspoon cumin seeds/jeera
1/2 teaspoon turmeric powder/haldi
1 and 1/2 teaspoon red chilli powder/lal mirch
1 teaspoon coriander powder/dhaniya
1/2 teaspoon garam massala (recipe here)
Salt to taste
1 cup water
1 teaspoon dried fenugreek leaves/kasuri methi (see notes)

Method:
In a blender, blend tomatoes with 4 tablespoons of water, garam massala, coriander powder, turmeric powder and red chilli powder into puree.
Heat oil in a wok/kadai. When hot, add cumin seeds. Let it crackle.
Add, bay leaf and asafoetida.
Add ginger garlic paste and cook for 1 minute. Turn the heat to slow.
Add tomato and spices puree. Mix. Cover and cook till tomatoes paste become red in colour and oil starts appear on the sides. Approximately for 8 minutes.
Add salt, chopped potatoes and peas. Mix. Add 1 cup water. Cover and cook again for 10 minutes. After 10 minutes, cook again for 5 minutes, the spices must have coated the potatoes and peas. If you see it is water, let it boil for more time.
Garnish with kasuri methi and serve.


Notes:
Cook it on slow heat, this ensures that spices are well blended with potatoes and peas.
You can add chopped coriander leaves as well.
This is a bit on spicy side, feel free to reduce the quantity of red chilli powder as per your taste.
Kasturi methi (dried fenugreek leaves) is easily available in any Indian grocery store. I used MDH oneImage may be NSFW.
Clik here to view.
.  

Serving suggestions:
Serve with any Indian bread- roti, parathas, puri or naan.
It is simple in process, but the taste is really elegant, so why not serve in parties.
Goes well with rice as well.
For Punjabi thali, serve it with rice, makke ki rotidal makhani and some chilli pickle.
For gujarati thali, serve it with palak puri, keri nu rasand dhokla.
For rajasthani thali- serve it with jowar ki rotimarwadi Bharwa Bhindi. and parathas.

Beetroot Lassi: Chukander Ki Lassi: Beet Smoothie: Summer Cooler


So, here I made another summer cooler.

Oh it is pink.

Refreshing and beautiful.

I made us Beetroot Lassi.

Roasted Beetroot Lassi.

You must know by now that I am addicted to roasting fruits and veggies. This is the best thing one can do in the kitchen. When you roast a fruit or a vegetable, it brings out its natural sweetness which gives a dish a fresh dimension.

And BTW this below pic is my first attempt on capturing steam :) Do you like it? Please comment :)


Check out more roasted summer recipes:


So what is lassi? In simple words it is a smoothie made with yogurt/curd (dahi) as a base. To it you can add fruits or make it plain with just sugar and water. I have prepared low fat (sugar free) strawberry lassi before and the world famous mango lassi too. But this is the first time I ever experimented with vegetable lassi and I am so glad that it happened. Lassi which is made with beetroot, ah! I mean look at the colour, isn’t it gorgeous and summery?

You can use plain beet as well, however I truly recommend to burn or smoke beetroot, it will bring a pleasant taste and you will be hooked- I bet! You can simply roast the beet directly on the hob, or you can grill in the oven at 200C for 10 minutes. Hob method is quick and easy-so you decide :)


After that you need to do is just blend in milk, yogurt, beetroot, sugar and water for few seconds and the lassi is ready. Oh yeah, I added rose water for aroma, you can add cardamom (elyachi) too. So yup that’s it. Serve it with or without ice cubes, but serve it chilled. It is summer after all. Bring on some sipping :)

Ingredients:
1 small beetroot/chukandar
1 cup yogurt/dahi
2 tablespoons sugar
2 tablespoons milk
4-5 ice cubes
1 teaspoon rose water

Method:
Peal the beetroot. Wash and roast it on fire till you see burnt spots on the skin. Let it cool.
In the blender blend everything together for 30 seconds.
Sieve the blended lassi through a fine sieve. This step is optional, but it gives nice smooth texture to lassi.
Serve chilled.


Notes:If using oven, cover the beetroot with foil. Grill at 200C for 10 minutes.
You might need to add more sugar depending on sourness of yogurt.
For thinner lassi, use 1/2 cup milk and 1/2 cup yogurt.
You can use low, skimmed or full fat yogurt.

Serving suggestions:
For a party, serve in fancy wine glasses. Garnish with rose petals or chopped nuts.
It is filling too, you can give it your kids as an evening snack, or have it as post-workout or gym snack.


Dum Aloo Recipes: 7 Dum Aloo Styles


Dum aloo , baby pototes cooked with spices. Dum Aloo (baby potatoes in gravy) ,takes on different flavours as it travels from state to state throughout the India. Todays post is collection of different dum aloo recipes.

Punjabi Dum Aloo:
Royal north Indian style dum aloo cooked with spices and dipped in tomato gravy. Get the recipe here.
Image may be NSFW.
Clik here to view.
merry tummy


Kashmiri Dum Aloo:
Gets it name from kashmir, northern most part of inida. In it goes kashmiri red chillies which is not at all spicy but gives dark red colour to the curry. Get the recipe here.
Image may be NSFW.
Clik here to view.
cook with manali


Benagli Dum Aloo:
Also known as Aloor Dum is richly spiced. The most important ingredient is mustard oil. Get the recipe here.
Image may be NSFW.
Clik here to view.
veg recipes of india

South Indian Style:
Also known as potato roast. Very dry curry with simple south indian spices. Get the recipe here.


Lucknowi Dum Aloo:
Baby potatoes are scooped and then stuffed with paneer. This is mildly sweet version. Get the recipe here.

Shahi Dum Aloo:
Which literally translates to Royal Dum Aloo. Royal because in it goes many whole spices and is then coated in cashews gravy. Get the recipe here.
Image may be NSFW.
Clik here to view.
saffron streaks


Niramish Dum Aloo:
Simplest style, no onion, no garlic and no tomato. Get the recipe here.
Image may be NSFW.
Clik here to view.
ecurry

So next time when you have baby potatoes, do try these Dum Aloo recipes.

Whole Wheat Focaccia: Black Olive and Garlic Focaccia Bread: Italian Bread


Life without bread would be so boring. How would you eat your pasta with no garlic bread on side? How would you make sandwiches? What would you serve soups with? All you need is bread to complete your meal.

Lately I have been in the baking sphere. I made Garlic Rolls a few days back and then Herbs Garlic Focaccia two weeks later. Focaccia is one such bread that every novice and beginner baker must try. No bread making can get simpler than this. It is rustic, it is soft and it can be paired with anything-dips, chutneys, lasagna, and pasta or just as it is.


Olive oil is a must when making focaccia and NO there is no substitute for olive oil. A good aromatic olive oil will bring out the best focaccia bread.  Focaccia is an Italian bread and there are hundreds variations for the recipe but the basic bread or dough recipe remains the same. You can change the toppings as per your taste and mood ;-). You can have tomatoes, garlic, olive oil, caramelized onions, nuts and even fruits as toppings.


For a healthier twist I crafted Whole Wheat Focaccia Bread with Garlic and Olives. Garlic, olives, some herbs all sitting on the top of rustic bread is something so enticing and inviting; plus is it guilt free-bonus! If you want to learn and know more about yeast and its process click here. Once you master the art of yeast then baking bread is very easy peasy.
Whole Wheat Garlic Olive Focaccia can be served with basically anything. My favourite way is to dip it in with some olive oil. If you fancy a focaccia sandwich, slit the bread in between and stuff in pesto sauce and some vegetables-grill and enjoy.

Cuisine: Italian
Serves: 4-5

Ingredients:
1 and 1/2 cup whole wheat flour
1 teaspoon rapid dry yeast
2 pinch sugar
1/2 cup water
1/2 cup olive oil
1/2 teaspoon salt
1/2 teaspoon black pepper
1 tablespoon mixed dry herbs
4 cloves garlic roughly chopped
5 olives roughly chopped
1/4 teaspoon coarse sea salt (optional but recommended)

  1. Method:
  2. Heat water in microwave for 20 seconds. Dip the finger and check water, it should we warm. Mix sugar and yeast in water. Stir and keep aside for 10 minutes.
  3. After 10 minutes when you see bubbles on yeast mixture, add flour, salt and 1/2 teaspoon mixed herbs. Mix and knead the dough.
  4. Mix 1/4 cup of oil in the dough. Keep kneading the dough till it is soft and springy.
  5. Grease one large bowl with 1 tablespoon oil. Put the dough in the bowl. Cover it with cling film and keep aside in warm surface for 45 minutes.
  6. After 45 minutes the dough should have risen, beat the air out and knead the dough again. Flatten the dough on a grease pan in to any shape (I shaped in round in pizza pan). The thickness should be like a normal crust of pizza. Cover the dough with wet towel and keep in a warm place for 20 minutes.
  7. After 20 minutes, poke holes (dimples) on the dough. Cover and keep aside for 10 minutes. Till then preheat your oven at 190C.
  8. Arrange chopped garlic and olives on focaccia evenly.
  9. Prepare the oil. Mix black pepper and remaining dry herbs. Keep aside.
  10. Pour this oil mixture on dimples of the dough. Spread the oil mixture evenly without punching the air. Sprinkle the sea salt.
  11. Bake for 15-18 minutes. The bread should be golden brown on top.
  12. Let the bread cool down before you cut and serve.

You can make it even without garlic. Or use whole olives. I used canned black olives.
Keep your dough in a warm place. I always keep it in the oven. A friend of mine who lives in the hills covers the bowl with a blanket and keep it dark place-for her this trick works.
You have to use a good quality olive oil for a nice texture. I recommend Colavita Extra Virgin Olive Oil.
Use active rapid dry yeast or also called as instant yeast. I used Allinson Easy Bake Yeast.
Mixed Italian herbs are easily available in any store. It is blend of oregano, thyme, rosemary and basil. I used McCormick Italian SeasoningYou can use any particular herb as well. Rosemary is the most popular one.
Cover the bread with cling film and store it a room temperature. It will be good for 2-3 days.

Serving suggestions:

Jeera Rice: Basmati Rice With Cumin Seeds: Indian Rice


Some one the other day asked me for the recipe of Jeera Riceand I was so shocked to know that the recipe is not on my blog. I mean you aren’t an Indian food blogger if you don't have jeera rice recipe on your blog. No seriously, I was so ashamed. Jeera Rice is like run in the mill in most of the Indian homes. Anyways, that day itself I made jeera rice clicked the pics and here I am posting it without any further delay.

Jeera as we call in Hindi is cumin seeds and is THE most important ingredient in Indian Punjabi cooking. Personally I cant do without this spice, be it paneer currieskofta curries or homemade spice mix like chaat massala or garam massala. The ancient Ayurveda and age old wisdom of grandmothers insist on having cumin seeds because of its medicinal values.


Common benefits of cumin seeds are:
Improves digestion
Increases concentration
Reduces cholesterol
Weight loss
Relieve stress
Deceases bloating and gas
Detoxifies liver
Reduces menstrual cramps
Increases lactation in new mothers
Coming back to the post, Jeera Rice is basmati rice (chawal) which is flavored with cumin seeds. Cumin seeds are roasted in ghee or butter to release the aroma, later cooked rice is mixed in it. Now here is one modification that take place, some use cooked rice (boiled rice) while some cook the rice with cumin like how you would do for biryani or pulav. No method is right or wrong, you do what you prefer. Things that remains the same is ghee (clarified butter), some cloves (laung), bay leaf (tej patta) and lots of cumin seeds.


Use a good quality long grain basmati rice for best results. You can read a complete post on how to cook rice perfectly for more tips and clear idea. I always cook rice in microwave to save time and then just pour the cumin seeds tempering on the rice, mix and cover it for 1 minute so that flavoures remain intact. This is the Plain Jeera Rice recipe, which is more like day-to day rice; to give it more elegant restaurant feel then you must add cashews and raisins (kaju and kismis).

What to pair with jeera rice? Check these out:

In simple words, jeera rice is a step further both in looks and taste from the regular plain boiled white rice. The little golden coloured cumin seeds mixed with pure white boiled rice gives a uplifting colour combination. 


Author: Shweta Agrawal
Cuisine: Indian: Punjabi: Bangladeshi: Pakistani
Serves:2-3


Ingredients:
1 and 1/2 cups basmati rice
1 teaspoon lemon juice
2 teaspoon cumin/jeera
1 bay leaf/tej patta
2-3 cloves/laung
3 cups water
2 tablespoon butter/ghee
Salt to taste

Method:
Wash basmati rice two three times. Soak the basmati rice in water for 30-40 minutes. Drain the rice and keep aside.
Put rice in microwave safe bowl. Add 3 cups of water, lemon juice and salt. Cook on high power for 12 minutes. Cover the bowl with plate and cook again for 8 minutes.
Heat a pan. Add ghee or butter. Reduce the heat to low.
Add in cloves, bay leaf and cumin seeds. Let cumin seeds turn golden. Heat a pan.
Add cooked rice and stir with softly. Make sure not to apply lot of pressure else rice will become mushy.
Let it sit covered. Fluff the rice and serve jeera rice hot.


Notes:
You can also use cardamom (elyachi) or cinnamon (dal chini) in the recipe. However I don’t like sweet aroma in rice so I avoid it.
You can use vegetable oil or sunflower instead of ghee or butter.
Lemon juice helps to separate the rice grains and gives nice white colour.
Use good quality long grain basmati rice. I recommend Tilda Basmati Rice.

Serving suggestion:
Serve as side with any indian curries.
Serve with lentils and dry curries.
Mix with salad, chutneys and stuff in tacos or burritos.


Red Kidney Beans Hummus: Beans Hummus: Summer Dip: 5 Minute Hummus


Good news! Summer is here and let’s pretend it’s going to be this nice for the whole year. Bring on some chilled cocktails, cold pasta salads and sandwiches. Are you gearing up for a beach bath, or having a BBQ in the park? Spending some me-time with a book or just watching a movie at home? Whatever it is, you guys have to bring in some colours, some happiness in form of Corkers. When the postman delivered this huge box of crisps at my door steps, the colours just brightened up my mood. Pink, purple, orange, blue, green all packed with crunchy crisps and flavours. 

What makes Corkers crisps so special is the fact they are made from delicious Naturalo potatoes, grown in the black, peaty fenland soil of Cambridgeshire, which give the crisps a unique crunch and makes them perfect for frying.  Not only are the potatoes grown on the family farm but it’s also here that they are hand-cooked to perfection.


You can pick your packet from seven bold British flavours, each featuring top quality, all-natural ingredients and cooked in fresh sunflower oil:
  • Pork Sausage and English Mustard– Expect the delicious flavours of barbecued British bangers finished with a hint of Old English Mustard
  • Red Leicester and Caramelised Onion– A winning combination of slow roasted onion and rich creamy red Leicester cheese
  • Sea Salt and Cider Vinegar– Made using the finest English cider which is sweet in taste with a hint of zest, these crisps will make your mouth water with every crunch
  • Sea Salt and Black Pepper – Sure to warm your pallet, these Gold Taste Award winning crisps are made from sweet and hot peppers
  • Duck and Hoisin Sauce - A partnership of two British greats, both the duck and the Naturalo potato, hail from the Corkers family farm.


I opened the packet of my favourite Sweet Thai Chilli crisps and the aroma was too tempting. Spiked with sweet chilli and herds; perfect crunch-you would only want more and more. Sea Salt flavour chips are simple and yet so elegant. Indeed it has won them great taste golden award. Fried to perfection, seasoned just right and the crunch is bang on. What else you would want in a crisp? Why not crush these crisps and add some crunch on your boring salads or pastas. Or escort them as a side with burgers, patties or any snack. Dive right in; Corkers Crisps are great for picnics, barbecues, potlucks, parties, and more! I am yet to try all the packets, but you can click here to check all delicious flavours.

Dips that would go with these crisps are:

Or like me, add Mediterranean flair to your summer menu. Pair with it hummus. Not chickpeas hummus (so yesterday!) but Red Kidney Beans Hummus: a.k.a rajma. A deep earthy flavoured hummus. Burnt garlic, green chillies, coriander leaves, ton of olive oil and lime juice- all blended into a velvety creamy dip. This will get ready in 5 minutes if you are using canned beans. Loaded with goodness of proteins, healthy fats and vitamin C. Pop open a beer or a drink, bag of crisp, this dip and enjoy summers.


Ingredients:
1 can or 400 grams Red Kidney Beans/Rajma
2 cloves garlic
1 green chilli
5 tablespoons coriander leaves chopped
2 tablespoons lemon juice
Salt to taste
4 tablespoons olive oil
2 tablespoons water


Method:
Wash and drain the red kidney beans. Strain and keep aside.
Roast garlic on open fire. Peel the skin and keep aside.
In a food processor or grinder, grind everything together till you get creamy dip.
Serve.


Notes:
If using raw beans, soak it overnight in water. Next day drain the water and boil in the open pan or pressure cooker till it becomes soft.
You can use cumin powder as well (jeera powder) in the recipe.
Coriander leaves can be substituted with parsley leaves.
You have to use a good quality olive oil for a nice texture. I recommend Colavita Extra Virgin Olive Oil.

Serving suggestions:
Serve with cucumber or carrot sticks.
Pair with bread, crackers, nachos or chips.
Use as a spread for sandwiches or pita pockets.


Veg Manchurian (dry and with gravy): Indo Chinese: Street Food


Ever since I posted this pic on Instagram, all of you have been asking for the recipe. Well I can understand your craze, after all every Indian is fanatical for Indo-Chinese food. Chinese food in India is in Indian style but with Chinese spices. We use black pepper, ajinomoto, soy sauce, vinegar but make it super spicy to suffice our taste. Every hook and corner you will see vendors selling indo-Chinese food- noodles, chow mien, spring rolls, fried rice, manchurian and what not. In fact we love Chinese inspired meals so much that we even have Chinese khakra, Chinese dosa, Chinese tikki, Chinese samosa, Chinese pizza –the list is endless.


No matter what, everyone loves indo-Chinese food in India. Just say, let’s eat Chinese today and see the person’s face all lighten up-that’s what Chinese meal does to Indians.  We have restaurants catering only Chinese food in India; restaurants like yellow chilli, mainland china and five spice are super posh and expensive and then there are medium range restaurants like china town, china hut, china wok as well. We also have road side vendors selling Chinese dishes on small karts, so whatever your budget is, whatever ambiance you prefer, if you are in India you have to try our style indo-Chinese dishes.


Personally, I prefer the road style Chinese food. Imagine the row of stalls in the night with dim yellow lights. Rich families drive their luxurious long cars to these stalls and enjoy the food inside the cars; students are just happy and satisfied to have such tasty dish in their budget; some just stand at stalls and scoop into hot and spicy food and take pleasure in simple life. Serenaded by the constant stream of honking and foot traffic on one side and delicious smelling hawker on the other side-the scene is so lively, I tell you.

Indo Chinese meals that I have posted before are burnt garlic noodles, egg noodles, schezwan veggie noodles, whole wheat momos and schezwan ildi. Today it is the most popular indo-Chinese dish- Veg Manchurian. Machurian is made with grated veggies which is then deep fried. It can be eaten dry just like that or can be made with gravy or sauce (wet).

This is neither a healthy dish nor does this takes less time. Lot of time and ingredients is needed to make Manchurian- but don’t let that stop you from trying this dish. This is the best Manchurian ever, its spicy, garlicky and super rich in indo-Chinese flavours.


(For balls)
1 and 1/2 cup grated cabbage/patta gobi
1 cup grated carrot/gajar
1/4 cup grated bell peppers/shimla mirch
¼ cup finely chopped spring onion/hari pyaz
1 green chilli chopped/hari mirch
2 tablespoon all purpose flour/maida
1/2 teaspoon black pepper powder/kali mirch
1 tablespoon chopped coriander leaves/dhaniya
1 teaspoon soy sauce
2 tablespoon corn flour
Salt to taste
Oil for frying
(For sauce)
2 tablespoon oil
1 tablespoon ginger chopped/adrak
1 tablespoon garlic chopped/lehsun
1 tablespoon finely chopped carrot/gajar
1 tablespoon finely chopped cabbage
3 tablespoons corn flour
1 tablespoon soy sauce
2 tablespoon tomato ketchup
1 teaspoon green chilli sauce
1 teaspoon vinegar
1 teaspoon sugar
2 cups water
2 teaspoons chopped spring onions for garnishing
Salt to taste


Method:
(for balls)
Heat oil in the wok for frying.
Mix cabbage, carrots, bell peppers, green chilli, spring onion, coriander leaves, soy sauce and salt. Keep aside for 5 minutes.
After 5 minutes, squeeze all the water from the veggies. Mix corn flour, all purpose flour and black pepper.
Make balls and deep fry in the oil. Fry till it is golden in colour. Drain on tissue paper and keep aside.
(For sauce/gravy)
Heat oil in a wok. When oil is hot, add ginger and garlic and sauté for 5 seconds.
Add finely chopped cabbage and carrots. Sauté for 5 seconds.
Add the remaining ingredients (except spring onions). Mix and let it boil for 8-10 minutes.
Add Manchurian balls in the sauce and serve.


You can use ajinomoto or mono sodium glutamate but I have heard its not good for the body so I avoid it.
Fry balls on the medium heat so that they are cooked evenly on inside as well.
Always cook Chinese in the wok on a high heat. I used this Joyce Chen Carbon Steel WokImage may be NSFW.
Clik here to view.
.
If you like thick sauce then add less water and more water for thin gravy.
Add more or less black pepper as per your taste.
I used Chings Green Chilli SauceChings Dark Soy SauceChings Chilli VinegarYou can use white vinegar as well.  

Serving suggestions:
They can be served as it is without gravy as starters or appetizers.
You can serve it as a side with plain rice or boiled noodles.
Serve with bellpepper noodles, egg noodles or fried rice.

Peas Rice: Matar Ke Chawal: Peas Pulav


So it was the hottest day of the year in London yesterday. People were freaking out, no one was happy with the sunshine. What do people want, I asked myself? When it is raining they sulk about it; when it is cold and windy they complain about it and yesterday they had problems with sunny weather too. No one seemed happy and everyone was just frowning-boy oh boy it is sooo hot!. Another funny thing, my Indian friends were going crazy too. Don’t you come from a place where it is more 40 degrees? How can they not tolerate 30C? Anyways moving on, I totally loved crisp clear sky, lots of sunshine and cold water shower for a change :)

Those of you follow me on instagram would know, I treated myself with some beautiful lilies and these lilies are now blooming, giving amazing fragrance in my hall. That fresh aroma, pink beauties and lots of sunshine helped me to complete this book. By the end of the day I was totally relaxed but was in no mood to slave myself in the kitchen cooking some elaborate meal. It had to be something quick and not spicy or hot.


Yeah yeah, pasta was my choice too, but Mr. Husband had pasta in lunch so I knew he wouldn’t eat it. So I did some quick search on my blog and decided to do something with rice. Rice and lentils. Daal Chawal. Simple yellow daal (no onion or garlic) just pressure cooked. For rice I made Matar Pulav. Green Peas Rice. Ah the comfort food!

What to pair with Peas Rice? Check these out:

Green Peas Rice or Matar Ke Chawal is one step ahead from the very basic jeera rice. I would say it is one beautiful rice dish but with least efforts. Just throw in some frozen peas, cooked rice, some spices and you are done. It is like a quick makeover or leftover rice magic too, infact leftover rice works perfectly fine :). I tried to keep it simple with fragrant whole spices.


There are many variations you can do in this recipe. You can add other veggies such as potatoes, capsicum, carrots, beans, onion and what not. In that case it will be very much like veg pulav which is a meal in itself, just pair it up with any riata. Then, you can also use Indian spices like turmeric (for colour) or red chilli powder. Some people also like to add nuts such as cashews (kaju) or raisins (kismis). As mentioned already, I crafted it real simple.

Ingredients:
2 cups cooked rice
1/2 cup green peas/matar
4 cloves/laung
2 black peppercorns/kali mirch
2 bay leaf/tej patta
1 teaspoon cumin seeds/jeera
1 tablespoons ghee or oil

Method:
Heat oil in wok or a pan. When oil gets hot, add bay leaf, cloves and peppercorns. Roast for 5 seconds.
Add cumin seeds. Let it crackle. Reduce heat to low.
Add ginger garlic paste. Sauté it for 1 minute.
To it add frozen peas. Cook till peas get soft.
Mix in rice. Stir properly. Do not apply pressure, else rice will get mushy.
Cover and let it sit for 2-3 minutes. Serve hot.


Notes:
You can omit ginger garlic paste.
If using fresh peas, boil it before using.
See all instructions on how to cook rice here.
Use a good quality indian basmati rice for best results. I used Tilda Basmati Rice.

Serving suggestion:
Serve as side with any indian curries.
Serve with lentils and dry curries.
Mix with salad, chutneys and stuff in tacos or burritos.

Corn On The Cob Kebabs: Corn On Sticks: Summer Appetizer: Vegetarian Kebabs


Who doesn’t like the colour yellow?

Sunshine...

Sunflowers...

Brightness...

Just the colour yellow makes me smile. Every summer I bring in lots of yellow lemons to make lemonade or sweet corn to have some charred corn on the cob at home. The yellow pearl like kernels sitting close to each other is a beauty in itself and then when you roast it, it looks even more beautiful.

These vegetarian kebabs. Or corn on the cob. Corn on skewers is one great summer appetizer or starter that will surely please the crowd. I was just wondering what to pair these kebabs with and then I thought of using the colourful box I was sent from The Berry Company special tea range.  Black, white, green, red and yellow all made form natural berries with no "yucky"bits.  


If this wasn’t enough, I must tell you all their drinks are:
Gluten Free
No Artificial Colourings
No Artificial Additives
No Artificial Sweeteners
No Artificial Preservatives
No GMO's
Dairy Free

Their Tea Range is a water based drink mixed with tea extracts and great fruity flavours.


Black Tea has been blended with elderflower and lemon.  A prefect thirst quencher.

Green Tea juice is mixed with aroina berry and blueberry. A drink full of goodness.

White Tea has been merged with peaches. An exotic and unique drink mix.

Red Tea muddled up with cranberries and grapes. A real tasty kick.

Now comes my favorite Yellow Tea. Yellow Tea is rare type of tea which is native to China. Both the leaves and infusion are yellow in colour. Dint I tell I am in summery yellow bright mood? This tea is mingled with coconut water and lemon which gives a super unique taste, you will surely be hooked. All you tea addicts and coconut fans must give this tea range a try.


Chilled yellow tea and spicy corns sticks is just like pair made in heaven and not to forget the yellow theme ;-). Oh these corn-on-the-cob kebabs are sweet, crunchy, lemony and so summery. To add in some extra bling I used juicy cherry tomatoes, bell peppers and onions, don’t they look beautiful? Feel free to add other veggies like aubergine, zucchini, and boiled potatoes.  For a slighter sweeter taste use fruits like kiwi, orange or berries. The twists and modifications are endless, it can have grated cheese, spicy spices, Italian herbs, yogurt dressing or can be made simple with lemon juice as well.


Like me, make it simple if you have less time in hand. I just made use of lemon juice, butter, salt and black pepper and it was uh-mazing! Tangy, spicy and buttery-what else you need?

Ingredients:
2 corns
1 bell pepper (any colour)
1 onion
4 cherry tomatoes
2 tablespoons lemon juice
Salt to taste
1 teaspoon black pepper powder (or to taste)
1 tablespoon butter
4 cups water

Method:
Soak the wooden skewers in water overnight or for atleast 2 hours.
Preheat the oven at 180C. Line a baking tray with aluminium foil.
Remove husk and skin from the corns. Wash and cut each corn into 3 parts.
Put water to boil in a large pot. When water starts boiling throw corn pieces in the water. Let it boil for 1-2 minutes. Drain on kitchen towel.
Cut bell pepper and onion into cubes.
Prepare the dressing. Mix butter, salt, lemon juice and black pepper in a bowl.
Arrange corn pieces, cherry tomatoes, bell peppers and onion on the skewers.
With the help of a brush apply the dressing all over the kebabs sticks. Arrange skewers on the lined sheet and grill for 40-50 minutes.
Keep turning the kebabs, so that you get burnt corn from all the sides.
Serve hot.


Notes:
You can use olive oil instead of butter.
Throw in some italian herbs for Italian taste.
Use chaat massala (Indian tangy spice mix) for Indian taste.

Serving suggestions:Serve it with any dip.
Pair it up with any summer cooler and drinks.

Disclaimer: I was not paid or told to write positive review. The post is based on my experience and is unbiased. Thanking The Berry Company for sending drinks  for review.

Chocolate Bark: Nuts and Seeds Chocolate Bark: Healthy Snack


More and more chocolate...

Oh yes!

Chocolate doesn’t ask silly questions, it understands. I am a huge sucker of chocolates. Not the sweet milk chocolates that melt in your mouth but the dark ones whose bitter taste linger on your tongue. Can you have coffee that is overpowering sweet? You need to have that strong bitter taste of coffee, isn’t it? Same is what I feel about chocolate. Chocolate isn’t a chocolate if it is not bitter. But hey that’s my opinion.


You will always get huge blocks of good quality dark chocolate in my fridge. After meals or just when my heart wants, I grab a little piece of chocolate to uplift my mood :-). Todays post is like a quick makeover to plain chocolate. A healthy makeover. A nutty makeover. Chocolate Barks With Seeds and Nuts.

Who can resist dark velvety chocolate with crunch of nuts? Use your favorite nuts and chocolate to make these delicious barks. Spread the melted chocolate depending on how thick you want your bars to be. I like them thin, so I spread a thin layer. I used handful of pumpkin seeds, walnuts and sunflower seeds. But there is no rule of thumb here, use any nuts such as almonds, cashews, raisins and even dried fruits like apricot, berries and dates. I used more dark chocolate but again feel free to use whatever you like more-white, milk or dark chocolate.

Have it like office snack, workout snack, give to your kids or gift it to your friends and family. The thing is it looks very rich and royal but the efforts that go in are minimal. Birthday, anniversary, house warming, valentine’s day, mother’s day, father’s day, christmas, diwali or just visiting someone’s home, these chocolate barks are always the great idea. Trust me, just use a fancy tray or plate, pack it up, ribbon it up and you have the best DIY chocolate gift ready.

Looking for DIY gift ideas? Check these out:
Movie Hamper
Lemon Sugar Scrub
Fridge Deodorant

100 grams dark chocolate packs-2
100 grams milk chocolate pack-1
1/2 cup mix of nuts and seeds (see notes)

Method:
Melt dark and milk chocolate in microwave for 30 seconds. You can use double boiler method as well.
Line a tray with parchment paper.
Pour melted chocolate on parchment paper. Spread the chocolate to thin layer.
Sprinkle seeds and nuts on it. Take a toothpick and mix nuts in the melted chocolates.
Refrigerate it in the freezer for 1 hour or in fridge overnight.
Break into pieces and enjoy.


Notes:
I used 4 tablespoons each of sunflower seeds, pumpkin seeds and walnuts.
Use a good quality chocolate. I used Godiva Dark Chocolate Bar 72%.
You can also use square or rectangle tin to make these bars.
Store in air tight container in the fridge. Stays well for 1 month.

Serving suggestions:
You can use them for chocolate cake decorations. Like shards here.
Take a piece and melt in your coffees, hot chocolate or plain milk.

Viewing all 124 articles
Browse latest View live